
FOUR YEARS
COAT ADDICT
MRS.NIPPLE’S WINTER PICKS

HOLIDAY LOOKS FOR THE LITTLES
MRS. NIPPLE APPROVED, HOLIDAY LOOKS
As many of you know I don’t like to buy expensive baby clothing (unless it’s monogrammed). There is one time of year I do bend the rules, and that is now! Here are my favorites.
THANKSGIVING LITTLE BOY
I’m also loving these MarriMane velvet coats for boys and girls. click here.
THANKSGIVING LITTLE GIRL
CHRISTMAS BOY
CHRISTMAS GIRL
CHRISTMAS PJS
Throwing a kids birthday party, tips & tricks
CHARLIE TURNS TWO
I was going back and forth between throwing Charlie a big birthday party or not. There has been so much going on between having a baby, moving, and going back to work full time. Last year Charlie's Oktoberfest themed party, you can read about it HERE, was one for the books. It also took a great deal of planning and I just didn't have it in me so I decided to reach out for help this year. I partnered with so many great companies that helped me plan his big day.
Before I get into all of the details I wanted to take a minute to thank some badass mamas that helped make Charlie’s day a stress free beautiful event!
It was beyond wonderful working with so many female entrepreneurs for this event. I feel so blessed I have been able to meet so many strong and creative women through Mrs. Nipple. These women are talented entrepreneurs that inspire! They not only run their own companies but they also run their households. They are all moms!
Dream and Party
Josefina: Three kids, including twins
Monogrammary
Brooke: Two boys, we were pregnant at the same time with our youngest
Stems & Co.
Lauryn: One girl and a baby boy on the way
Zoe: 10 month old baby boy
Songs for Seeds
Courtney: One 9 month old daughter
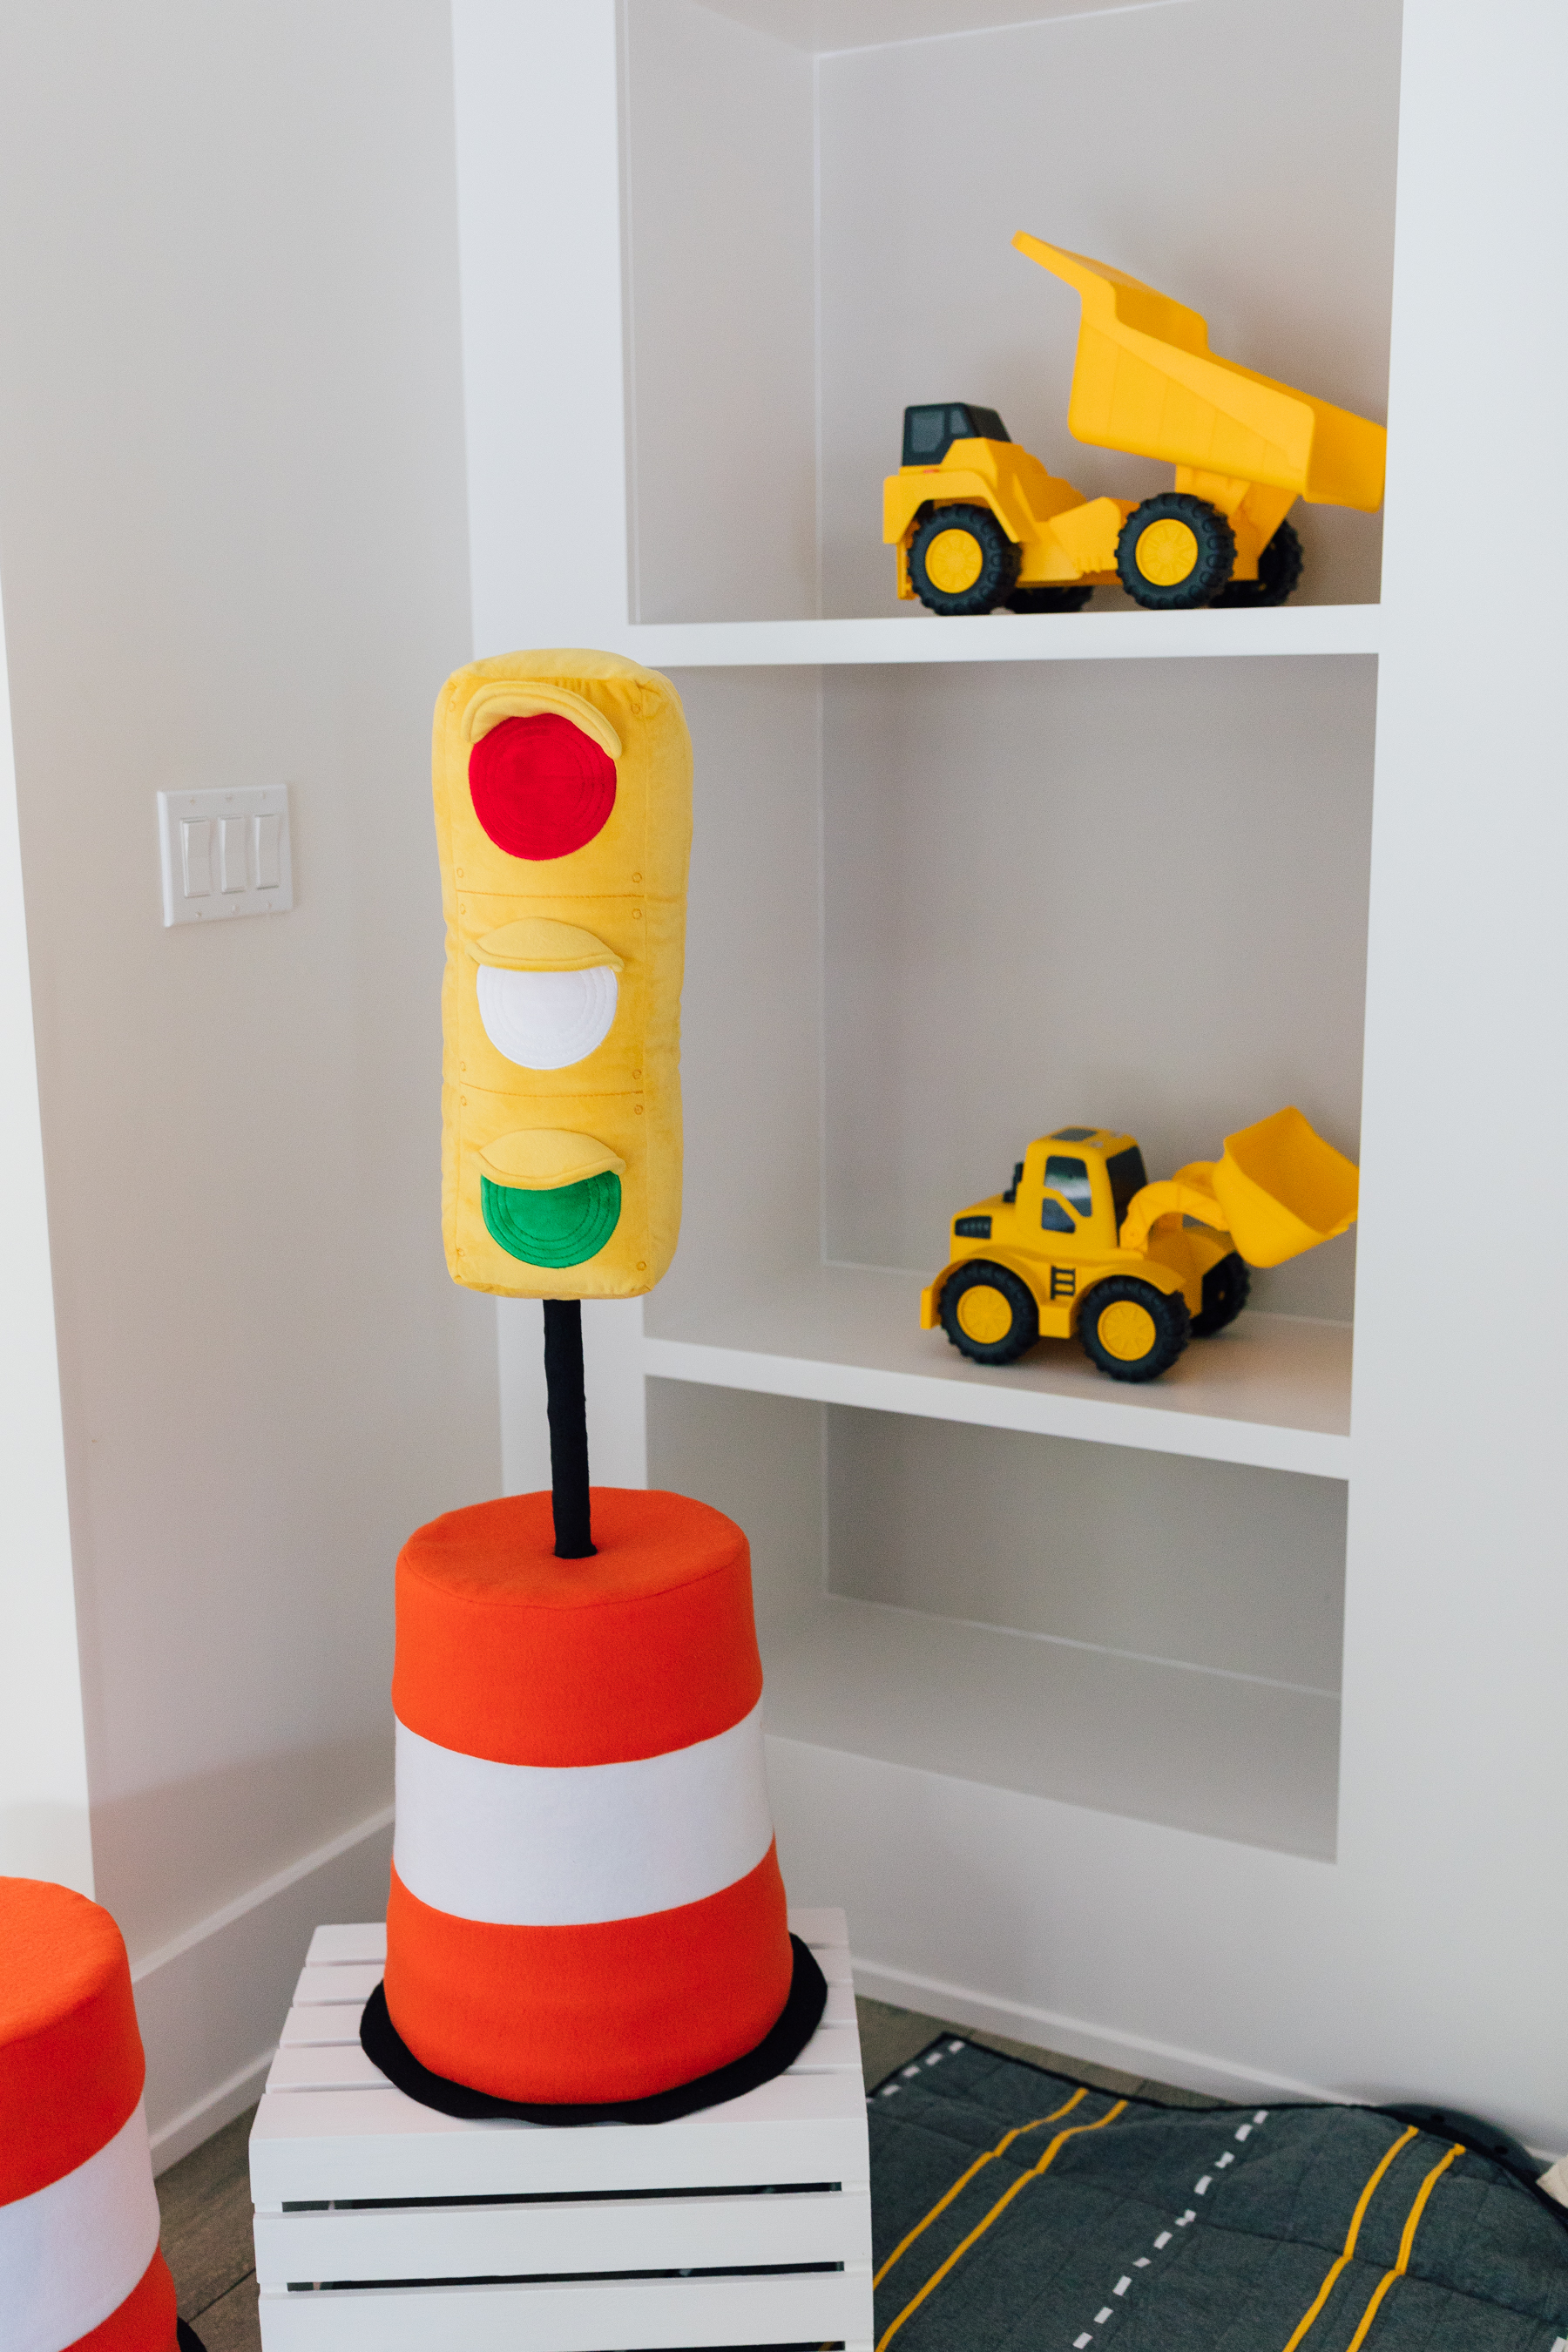
THE DECOR


When I stumbled upon Dream and Party LLC on Instagram I was blown away by their attention to detail. You can tell how much love goes into each event they are involved in. From kids’ birthday parties to festive soirée adult parties, they nail it every single time. You can check out their instagram, HERE and website, HERE. Her signature teepee parties are fun for all ages.
I connected with Josefina over instagram and we set up a call. We spoke about some kids parties she had done in the past. She has created some very cool themes but had never done a truck party. I was fairly positive I wanted the truck theme but I also wanted a fun spin, so I came up with the idea of a terrible twos truck party. Josefina LOVED the idea and told me to just trust her and she would handle everything. When she said everything she wasn’t kidding! She can do it all, to the extent of planning and implementing the entire party. I decided she would handle all the decor and I would handle the food, entertainment & invites.
Josefina came over for a meeting a few weeks later so we could chat and she could check out the space. She brought over some items and fabrics so I could get a sense of the direction the party was taking. She was so great at checking-in just enough to make sure we were on the same page. She told me she had a good enough idea of what I wanted and she took it from there.
A day before the party she came over to drop off everything. I didn't have her set up until the day of the party so Charlie would not have the chance to destroy her work. She came back the next day a few hours before party time and set up everything. Then when the party was over, she came by and packed everything up. We didn’t have to do a thing!
Josefina and her team did an incredible job!. They literally created a magical truck themed display while incorporating fun teepees and the colors and feeling of fall. They didn’t miss a beat and made a little boy’s construction themed party look chic and trendy. I didn't even know that was possible! One thing I picked up on during our meeting is how concerned Josefina was with the quality of the materials she uses. Her team actually hand made many of the party decorations including the adorable felt cones and the big orange and white construction cylinders. Another thing which I think is so important when working with someone is how flexible they can be. I told her I had an idea just one day before the party and she made it happen. I wanted a coloring station for the kids & fall tee pees in front of the house and voila…DONE!
She is an amazing entrepreneur, who is also a mother, and she truly inspires me. She had a vision and is making it happen. She is proof that if you have a dream, then go for it! She is killing it with her dream, Dream and Party LLC.


THE THEME


Picking a theme can be hard. At age 1 you can really do whatever you want. I did an Oktoberfest theme because I knew it would be fun for the adults and at one year, it's not like Charlie would know either way. Age two is different. Charlie loves trucks. I think you should just go with whatever your child gravitates towards, whether it's a form of transportation, a favorite movie/tv character, or animal. There's nothing like seeing them so excited on their birthday. To make it fun, I added in the terrible twos theme which could go with any of the above themes as well. I always use Paperless Post because you can track all the invitations and RSVPs. I like to keep it as simple as possible. I found these adorable invites for the party.

THE ENTERTAINMENT


For kids parties I like to have two activities that would be appropriate for multiple ages. Between family and friends, we had kids ranging in age from newborns to 13 year olds. I got the older kids involved by having them run the kids table.
I chose to have Songs for Seeds as the main entertainment. The three piece band was a huge hit and the kids all loved it. I had them arrive as the party was starting. They set up in about 20 minutes and were ready to jam! I wanted an activity that would be fun and entertaining for all ages. The band played for 30 minutes which was the perfect amount of time for a 2 year old party. They were high energy and really got all the kids on their feet, even bringing musical instruments for the kids to jam along with them. I could not recommend professional entertainment like this enough. The adults not only enjoyed the performance but got a breather from monitoring their kids. This was the only part of the day the children all stayed in one area. Songs for Seeds holds classes in Greenwich, New Canaan, and Darien and I highly recommend them. You can check them out, HERE. They hold classes for babies, mixed ages, and big kids. They also do events!


I also wanted an activity after the musical entertainment. I asked Josefina to set up a separate coloring table. I used THESE great coloring paper rolls perfect for parties. You can roll them out over the tables just taping them down at the ends to prevent the paper from slipping. You can also get even bigger rolls to cover the walls, great ideas for a party activity. Just remember to get washable crayons. We only use these rolls in our home now. It was always really hard for Charlie to color in coloring books, these stay put!
THE FOOD


Last year we went over the top with the food and I wanted to keep it simple this year. We did pizza from our favorite local spot, Rikos Pizza. I not only LOVE their pizza (we order delivery all the time) but it's also perfect for parties. I've said this a million times but thin crust pizza is the perfect snack :) You never feel too full even if you eat multiple slices. Rikos Pizza also happens to be the perfect eat on the run option for food and by eat on the run, I mean eat while chasing your kids, also easy eats for the kiddos as well. We did some chips and dip for snacks. Since it was a 3 p.m. party, it wasn't lunch and wasn't dinner so I knew that would be enough food. Riko’s has locations all over Stamford and the surrounding area. They just opened a new spot on Selleck Street. You can check out their website, HERE.
THE CAKE


I used a local cake/cookie baker that is very talented. She is a full time teacher that bakes on the side. She did Charlie’s infamous first birthday boob cake, HERE, and nailed it again this year with his 3D truck cake and construction themed cookies. Her cake and cookies were not only nice to look at but were delicious as well.
THE FLOWERS


Who doesn’t love fresh flowers? I’ve really wanted to work with Stems & Co., a local florist out of Rowayton, for as long as I can remember. They design the dreamiest, most whimsical arrangements. When I contacted Lauryn & Zoe, I told them I wanted black & yellow arrangements so they would blend in with the truck theme. They turned out absolutely beautiful. I love little touches of the unexpected, like lovely arrangements at a kids birthday party. It really softened all of the bright colors and added some beautiful calming hues to the day. They did a few medium sized arrangements plus a cute smaller arrangement for the bathroom. You can find their instagram, HERE and website, HERE.
THE BIRTHDAY BOY OUTFIT


I wanted something cute but timeless. If you have followed me for a while you also know I love matching the boys’ outfits. I think it's important to either order clothes for special occasions early enough to leave yourself time to exchange if you are not satisfied or order from a place you trust. I worked with Brooke from Monogrammary for this event and she is definitely someone I can trust. When I ordered the sweaters (the idea came to me in the middle of the night when most of my ideas do) I was fully confident they would turn out great. I wanted something classy and fun all at the same time and she designed trucks on the front and embroidered “Terrible Twos” on the back of Charlie’s sweater. Ford had “Angel Baby” on the back of his. These high quality roll neck sweaters are such classics and looked adorable on the boys. I'll be hanging onto these for the long haul. I like choosing something that’s not too busy but will still stand out, keeping it clean always looks better in photos when there might be a busy background. Brooke nailed it with these one of a kind adorable ivory truck themed sweaters. You can find her on instagram, HERE and her website, HERE.
photographs by @juliadags
GHOST PIZZA
SPOOKY PIZZZA

This was very fun to make and I actually can’t believe the finished product looks like it was semi supposed to look! I like to keep things simple when it comes to cooking but if you would like the make it from scratch recipe you can find @lastingredient instructions below.
I called a local pizza shop and ordered dough that had already risen. I picked up the dough and purchased the sauce, pesto and a ball of mozzarella cheese at Whole Foods. I cooked the pizza dough with the sauce and pesto already on top and then put the slices of cheese I cut from the ball of mozzarella on the pizza and watched it closely. I wanted it to start melting but still wanted the cheese to semi hold its shape. The mozzarella was kind of watery so i dabbed some of the extra liquid with a paper towel. There are two things you can do to try and prevent this from happening (see below) . I then cut some pitted black olives to create eyes and a mouth!
1) Lengthen Sitting Time
Instead of placing the mozzarella onto the pizza right after it is cut, slice the fresh mozzarella ahead of time and set the slices on a towel to absorb excess moisture for at least 15 minutes. You can also dab the top of the slices to soak up extra moisture. Once the mozzarella slices seem dry, you must add to the pizza and bake.
2) Shorten Cooking Time
After you have put the sauce and any other toppings on the pizza, place in the oven without the cheese; do not put the fresh mozzarella on the pizza until the last few minutes of cooking time. Fresh mozzarella only takes a few minutes to melt, and if it melts and then continues to sit on the pizza as it bakes, the cheese will start releasing moisture.
The pizza was delicious, very festive and most importantly a ton of fun! To see @lastingredient’s recipe keep reading.

“There are a few foods I love so much that I could eat them every single day, and pizza makes the cut. I adore chewy, perfectly browned crust simply with tomato sauce and mozzarella. Toppings make an occasional appearance, but I am more than content with a classic margarita pizza void of gimmicky additions. Any style pizza will do as long as it is not deep dish—apologies to Chicago! I feel fortunate to call this phenomenal city home, but I have never been a fan of its signature pie. With all the Neapolitan pizza spots that have opened here in the last few years, I know I am in the good company of other Chicagoans.
My pizza consumption is not limited to dining out or delivery. I rely on my well-worn pizza stone during cold weather months, and when the temperature warms up, I head straight outside to the grill because restaurant-quality crust is a sure thing with grilled pizza. The dough is placed right on the grates and grilled on both sides before it is taken off, so the toppings can be quickly slathered on the crust. The pizza returns to the heat to allow the cheese to melt. The grill-marked pie is enough to make me reconsider how I make pizza year round, but for now I will bask in the sunshine-filled months ahead.
Grilled Pizza
Makes two 12-inch pizzas
For dough
1-1/4 cups warm water
1 packet dry active yeast (2-1/4 teaspoons)
1 teaspoon granulated sugar
1 tablespoon olive oil plus more for oiling bowl
3 cups bread flour plus more for dusting
1 teaspoon kosher salt
For tomato sauce
1 tablespoon olive oil
3 garlic cloves, peeled and smashed
1-28 ounce can whole peeled tomatoes
1/4 teaspoon salt
1/4 teaspoon black pepper
1 pinch red pepper flakes
For pizza
1 tablespoon olive oil
8 ounces fresh mozzarella cheese, roughly torn into pieces
1 handful baby arugula
1 tablespoon crumbled Parmesan
For the dough, combine the water, yeast, sugar and olive oil and let stand for 5 minutes until foamy. In a large bowl, mix together the flour and salt. Add the wet ingredients to the dry and stir until it forms a shaggy dough. Turn the dough onto a lightly floured work surface and knead for 10 minutes until the dough is smooth and elastic. (Alternatively, the dough can be mixed in the bowl of a stand mixer using a dough hook.)
Gather the dough into a ball, transfer to an oiled bowl and cover. Place the bowl in a warm spot to allow the dough to rise until it has doubled in size, about 1-1/2 – 2 hours.
For the tomato sauce, heat the olive oil in a large skillet until it is shimmering. Sauté the garlic cloves for a few minutes, so they become fragrant. Add the tomatoes, salt, pepper and red pepper flakes and simmer for 30 minutes until the sauce has slightly thickened. As the sauce is cooking, break up the tomatoes using the back of a wooden spoon or a potato masher. If you prefer a smoother consistency, when the sauce has finished cooking, transfer it to a blender and puree.
Once the dough has risen, give it a quick knead and divide it into 2 equal portions. On a lightly floured work surface roll out the dough into two 12” diameter circles. They do not need to be perfectly round.
Preheat a gas or charcoal grill on high heat. Place the rolled dough directly on the grates and grill for 3-4 minutes with the lid closed until the crusts have grill marks and have puffed up. Turn over the crusts and grill for an additional 2 minutes.
Remove the crusts from the grill and flip them over so the first side that was grilled is facing down. Brush the tops of the crusts with olive oil. Spread the sauce leaving a 1/2-inch border at the edge and scatter the cheese on top.
Return the pizzas to the grill and cook until the cheese has melted, about 3 minutes. You may need to lower the heat a bit to make sure the crusts do not burn.
Top with arugula and crumbled Parmesan before serving.
Note: If you have extra tomato sauce, store it in the refrigerator up to 5 days or keep it in the freezer up to a month. The tomato sauce also works well on pasta.” - www.lastingredient.com
TOILET TALK..POTTY TRAINING
MAMA SERIES X TOILET TIME
Toilet Talk
Toilet Training in 3 Days or Less
Hello Mama’s! My name is Nancy Hake and I am a certified Special Education teacher in both Connecticut and North Carolina. I have over 20 years of experience in the education field working with children ranging from 3 years-21+. My most extensive work has been with preschool and elementary aged children with special needs. I also have a background in applied behavior analysis, management and techniques. I am currently a SAHM to my 18 month old son, Charlie.
Aside from sleep training our little ones, one of the next dreaded questions is how do I toilet train my toddler? How do I know that they are ready?
There are a few simple questions you should ask yourself before getting started:
Does your child have the motor skills necessary for independent toileting; Can the walk to the toilet, sit independently, pull their pants up and down?
Can your child follow basic 1-2 step directions?
Does your child have a means of communicating the need to go? This does not mean they have to be able to verbalize the need. Other forms of communication can be used such as a picture icon or sign language.
Are there any medical reasons which may inhibit your child to feel the urge to go?
I will encourage you to wait to begin this 3 day process if you can rule out any of the above.
It is important to note that there are many methods to toilet training. I am not going to say that this way is the end all be all version, but I have successfully used these methods with non-verbal children, children with behavioral challenges etc..
Before starting, model to your child the toileting process (when appropriate). Invite them into the bathroom when you have to go. Verbally tell them, “I have to go to the bathroom” and go. Toddlers are sponges, they pick up on our routines. When we make it a part of the day, they will most likely want to make it a part of thiers.
Getting Started:
You will need to set aside 2-3 days to stay at home. Do not begin this procedure if you are heading out of town or have lots of weekend activities planned. Many choose to start in the summer when their child can be free of clothing. With this plan you can begin at any time as long as you can guarantee being home for a majority of the day.
Identify a highly motivating item for your child. For many this may be an “M&M” for others it may be a few minutes of screen time. Regardless of what it is, it is CRITICAL that there is no access to the item at any other time other than toileting. The reinforcer will lose its value if offered at other times.
Create a bin to keep within reach of your child with extra pull ups, wipes, underwear, changes of clothes. This is necessary for your child to become a team member in the toileting process.
Stock up on juices, popsicles, salty foods. Why? Salty foods create thirst, thirst creates the urge to drink which creates the need to go!
Create a busy box for the bathroom (small toys, books, etc.) You want to pair the bathroom as a motivating place to be. Keep the isolated reinforcer in there as well.
*Avoid the use of a kindle or IPad because this can become very distracting and your child may just end up sitting on the toilet all day.
Find a timer to use. You will need this to monitor your last bathroom trip.
Be prepared! Are you sure you are ready to begin? There’s no turning back.
Start by allowing your child access to drinks and popsicles. If they do not appear to be thirsty, allow them to eat some salty foods. Keep the drinks within their reach throughout the day.
Set the timer for 30 minutes (this time will increase when success is met).
When the timer goes off simply state “It’s time for the bathroom”.
Take your child directly to the bathroom. Ask them to notice whether or not they are wet or dry. If they are dry sit them directly on the toilet. Keep them there until they void (pee).
When your child does meet success and pees, make it the biggest celebration!! YAY!! You peed on the potty!! Immediately reinforce them with the item you have chosen. Complete the toileting process of wiping, pants up, flushing, washing hands.
Reset the timer and start the above process again.
When your child has an accident… Immediately state in a disappointed tone (not yelling) “You have wet pants, we pee on the potty”. Take them quickly to the bathroom (allowing them to walk) and have them take off the wet clothes. Sit them directly on the toilet. This is where the busy box comes in handy. Keep them occupied in the bathroom until they are able to pee on the toilet (even if it’s just a little bit). Once they pee on the potty provide tons of praise and reinforce with your pre-determined item right away.
Once they complete the toileting routine, have them go to the basket with the extra clothes to help get dressed. Ask them to give you the pull up or underwear and a clean pair of pants since the old set is now wet from the accident. Have them put the wet clothes in the sink. You want to make having an accident inconvenient for not only you, but them.
If your child is successful with the 30 minute intervals you can increase in 15 minute increments. Increase after 2-3 consecutively successful trips to the bathroom. Toddlers will need reminders at times to use the bathroom, especially if they are busy playing, so don’t expect them to independently request every single time in the beginning.
Once you are successful for a few days at home you can take your training on the road!
Take your child to the bathroom right before you leave the house.
Keep a portable toilet in the car. Toddlers will need the bathroom at the most inconvenient times and we don’t want to reinforce having accidents because a bathroom isnt nearby.
Introduce them to the bathrooms in the public places you visit so they know where they are and that they can ask to go.
Keep extra changes of clothes in your diaper bag because we can assume a few accidents will occur on the road.
Key points to remember:
Reinforcement is the key! The more motivating the reward, the more likely your child will want to be successful.
Remain consistent in your methods, reactions and rewards.
Don’t give up. Toileting is a huge milestone for children.
Expect that peeing on the toilet will come easier than poop. (That’s a whole other blog post).
Most important: Stock up on the wine! It’s going to be a long couple days, but well worth it in the end.
Good luck to you all! I’ll be taking this adventure very soon with my son.
Please feel free to reach out with any questions, comments, successes and failures.
Happy Toileting!
Nancy
WHEN YOUR BABY HAS A DAIRY ALLERGY AND YOU LOVE CHEESE!
TIPS FOR CUTTING OUR DAIRY AND WHAT TO EAT INSTEAD, MRS. NIPPLE X MAMA SERIES
Welcome to the mama series! Today Mrs. Nipple is featuring Jenny, just a mom that loves cheese :)
JENNY WILL TAKE IT FROM HERE:
I remember exactly when I discovered that my daughter, Maple, had a dairy allergy. She was five weeks old and we were at the zoo alleviating some of the guilt that I had been feeling over taking my son’s only child status away. While changing her in the less than clean bathroom, I saw a small amount of blood in her diaper. From my weekly trips to our hospital’s New Moms group, I knew that it meant, dairy intolerance. That being said I wasn’t surprised when the nurse from our pediatrician’s office told me to cut out dairy and monitor her diapers.
The thought of cutting out all dairy from my diet was daunting. Never being much of a meat eater, I have always relied on dairy for a large part of my protein intake. And I also loved cheese. Like really really loved cheese. All kinds of cheese. Warm brie with toasty bread. Sharp cheddar on a crispy cracker. A salty tortilla chip dripping with queso. Fondue. Nachos. The perfect grilled cheese sandwich….and pizza. Ohhh pizza. I wondered how I going to give up so many of my favorite foods but I was determined. Nursing my first baby had been such a rewarding and wonderful experience. Cheese could wait because nursing this baby wouldn’t.
I never saw blood in Maple’s diaper again, and a rash that she had had for weeks disappeared within days of me cutting out dairy from my diet. Seeing these positive changes made me realize it was time to buckle down for the long haul of dairy free living. I joined a helpful Facebook group and reached out to my vegan friends for recommendations on substitutions.
I quickly learned that sometimes in life, there are no substitutions. So I’m here to share some of my tricks for navigating dairy free products and avoiding getting dairy-ed while you’re out.
As far as the grocery store, I’ve found that cheese cannot be replaced, unless you really do your homework and know which brands are best. TIP: Someone told me that you should wait a little while to even try “fake” cheese so that you’ve forgotten how good the real thing is but you can find some great alternatives below.
I’ve seen such an increase in dairy free products over the two years that it does make dairy free living much easier. I was never a milk drinker and have used Almond Milk for years. I use it in my coffee and oatmeal, and did you know it’s even froth-able? I have played around with different milks and discovered that coconut milk is great for baking and using to make pasta sauces.
If you’re having a sweet tooth, there are so many choices. Enjoy Life chocolate chips are great for baking and their cookies aren’t bad either. Justin’s dark chocolate peanut butter cups are my go to treat. I have a recipe on my website for lactation boosting, energy balls that are sweet, healthy and will increase your milk supply, too! You can find the lactation boosting energy balls, HERE.
The biggest tip I have is to read all labels. Many products that you wouldn’t think have dairy in them do. It can differ from brand to brand. Our local grocery store’s brand of English muffins are dairy free, but most other brands have dairy. you should check every time. Sometimes brands change their recipes, so something that was once safe, may not be the next time. While companies are required to list allergens, you still have to read the ingredients. Sometimes the allergens will just be in bold in the main list of ingredients rather than highlighted underneath the ingredients. Thankfully, most of the time the latter is the case.
A great place for recipes, both dessert and main dishes is the Minimalist Baker. You can find her website, HERE. Her recipes are easy, have minimal ingredients and are always yummy. Her recipes are also gluten free!
When you’re eating out, you really can’t be clear enough. Sometimes people don’t think of butter as dairy. Or if you ask for no cheese on something, it could still arrive with sour cream on it. A friend of mine got baked fish and didn’t think of the butter that was hiding in there. You have to be vigilant. It’s hard to be that person at a restaurant but it’s for your baby, so that should help. Servers handle these requests interestingly. I had one ask me if it was an allergy or a preference, with a lot of emphasis on preference. I made sure to tell him exactly why it was not a preference, thank you very much. He also got a little lesson in breastfeeding.
Giving up dairy feels very overwhelming at first but you’ll start to get the hang of it and you’ll notice that your baby’s symptoms start to dissipate. You will feel like the rockstar mom that you are: feeding your baby through a little bit of adversity. So maybe you’ll be dreaming of being reunited with a margherita pizza with the perfect amount fresh mozzarella. But just think of how amazing that first bite will be. You got this.
Jenny’s Bio: Jenny formerly used her quick wit to charm people at parties but now she mainly uses it to trick her children into eating vegetables. She can be found pondering mamahood on her blog, HERE and on instagram as JennyRadish.
A big thank you to jenny for sharing!!
One of my friends, Stephanie Trotta, who also happens to be a blogger lives a dairy and gluten freeish lifestyle. She is the force behind, The Girl Guide. You can read her post about being dairy free, HERE. Many of her go to recipes are found on GOOP. She uses some really good dairy free alternatives which include,
Califia Farms Almond Milk
Follow Your Heart Parmesan style shredded cheese alternative
Kite Hill Ravioli made with almond milk ricotta
Kite Hill Chive cream cheese
LAVA original whole food plant based yogurt
Follow Your Heart soy-free Vegenaise Better Than Mayo
Thanks for sharing your go-to DF products Stephanie xx
Your baby is ready to eat!!
Your baby is ready to eat! Now what?
DISCLAIMER: ALWAYS CHECK WITH YOUR DOCTOR BEFORE MAKING ANY CHANGES TO YOUR BABIES DIET OR LIFESTYLE
FEEDING BABIES SOLIDS
We wait until around six months to introduce solids but most doctors say you can start anywhere from 4-6 months. It depends on neck strength to hold up the head, loss of the tongue thrust reflex that results in baby pushing out food, if your baby seems hungry even after breastmilk/formula, being able to sit up, and if your baby seems interested when you eat. Even when Charlie was doing many of these things I still waited until he was around six months.
Always remember that in the beginning, feeding your baby is all for fun and it should be just that! You won’t decrease breastmilk or formula at first because you are feeding your baby small amounts just to get used to eating and to the many different tastes and textures.
Make sure not to overfeed your baby in the beginning. Start out with two meals per day, feeding your baby 2-4 tablespoons. (4-6 months old). At 7-12 months, feed him/her three meals, each the size of a baby’s fist.
What should babies eat?
You can pretty much start with anything, either fruits, veggies, or meat. As long as it’s pureed it doesn’t really matter what you choose. Baby led weaning is another option that I do not have experience with when it comes to first foods. Just a reminder that honey and corn syrup should not be introduced until after age 1.
One thing I feel passionately about it giving your baby the highest quality of foods you can afford. Even if you don’t eat organic produce, grass-fed beef or free range eggs I personally feel the splurge is worth it for your baby.
I skip right over rice cereal. There are so many reasons why but the main and most important one is that rice cereal contains arsenic. Yup, arsenic.
I personally chose meat over rice cereal and grains which have the same level of fortification of iron and zinc as fortified cereals. To make up for that iron needed for breastfed babies only (there is usually enough iron in formula) I incorporate grass fed lamb and grass fed beef.
Breastfed babies iron levels drop at around 6 months so they do need iron packed foods because their iron stores are depleted, your 6- to 12-month old baby needs to be consuming about 11 mg of iron per day.
“Although babies do not need grains, they do need to eat complex carbohydrates, Peternell said, adding that butternut squash, zucchini and sweet potatoes are all excellent choices. If you choose to feed your baby grains, choose a variety such as oats, multigrain cereal, barley, quinoa and millet. In fact, breastfed infants who were fed pureed meat had higher levels of iron and zinc than those who were fed an iron-fortified infant cereal, according to a study in the Journal of Pediatric Gastroenterology and Nutrition.
If you’re raising your baby as a vegetarian, egg yolks are also a good option. Although legumes are iron-rich, they’re not a complete protein unless they’re combined with grains and they should be offered occasionally and when your baby is older, Peternell said.
If you decide to offer grains and you find it makes your baby constipated, foods such as prunes, plums, pears, peaches and apricots can help combat it.
Also, keep in mind that no matter what types of foods you introduce, you should start to offer a new first food every three to five days.
The most important thing is you want to give your baby a wide variety of solids,” Ansel said." Source: FOX
FIRST FOODS
I like introducing foods that are nutrient dense. These include: blended red meat, egg yolk, liver, avocado, banana, squash, meat stock or bone broth.
“1. BLENDED RED MEAT
A 2016 study found that babies who eat along the lines of baby-led weaning are more likely to be deficient in iron, zinc, and vitamin B12, which are super critical nutrients for your growing baby.
Vitamin B12 can only be found in animal foods, and the best sources of iron and zinc are found in red meat like grass-fed lamb or beef.
Keep in mind that breastmilk is low in iron (whereas formula is iron-fortified), so we must get it through diet. Plant sources of iron are poorly absorbed—especially for an immature digestive system that has a harder time converting plant-based iron to the kind we can use—so heme (red meat) iron is best.
To prepare: Once you cook the meat, be it ground meat, or a lamb chop or tender roast, put it into a blender with some filtered water or broth and blend it into a creamy puree to spoon feed to baby.
2. Egg yolk
Loaded with healthy fat, choline (great for baby’s brain and eyes!), and necessary cholesterol—it’s the building block for ALL of our hormones—pastured egg yolks are an easy first food for your baby. Sensing how nutrient-dense egg yolks are, babies often gobble them right up (once they get used to the texture and taste, that is!).
Egg yolks also contain important minerals that baby needs right now like calcium, zinc, selenium, phosphorus as well as vitamin E and vitamin B6.
To prepare: Be sure to soft cook the yolks as not to damage the nutritional profile. Either soft boil the egg and take out the undercooked yolk, lightly poach the egg or cook it over easy. It’s best to serve egg yolks with a bit of fat for optimal absorption of the nutrients, as well as for better digestion (and taste!). Coconut oil may be easiest if it’s in liquid form. You can then sprinkle some shredded liver into it for an extra boost of nutrition.
3. Liver
Offal, or organ meats, are not really part of our culture anymore—but they should be! Organ meats are still an amazing food choice due to their high concentration of nutrients. Liver is also high in true vitamin A, which is extremely important to baby’s development. (Yes, carrots and other orange foods contain beta-carotene, but it doesn’t easily convert to true vitamin A, which is why many babies turn slightly orange when they eat beta-carotene rich foods!) The best source of true vitamin A is animal products, particularly liver.
Liver also contains vitamin D, all B vitamins, folate, zinc, and CoQ10. If you choose chicken liver, you get a good amount of iron as well, which is vital.
To prepare: Purchase high-quality, grass-fed beef, bison or lamb liver. Cook over medium heat in a frying pan in a little ghee or coconut oil. Once one side is brown (not browned or burnt), flip liver and brown the other side. (It cooks fast so keep your eye on it!) You can then add to blender with a little water or broth and serve as a puree. Or, you can let the liver cool and then grate over baby’s egg yolk or banana mash. Do not over feed your baby liver, small amounts are the perfect size.
4. Avocado
Avocado is a great first food. It contains lots of healthy fats, as well as the almighty mineral magnesium, which is so crucial to our health yet is harder and harder to get enough of through our food these days.
Avocado also contains B vitamins including niacin, vitamin E, vitamin K, potassium, folate, and fiber.
To prepare: Cut a whole avocado in half lengthwise, and twist to open. Run a butter knife from top to bottom to make slices, and scoop out with a spoon. Likewise, you can mash or puree the avocado and spoon-feed it to your infant. It’s delicious mashed with ripe banana for a 1:1 ratio.
5. Banana
Some people believe that baby’s first foods shouldn’t include any fruit because baby will get a preference for the sweetness. Truth is, baby already has a preference for sweetness thanks to breastmilk! So don’t worry about baby becoming a sugar bug because of fruit. Bananas are a great first carbohydrate source for babies because they contain amylase, an enzyme necessary for the digestion of carbohydrates (like, bananas!).
Bananas are also a great source of important nutrients like vitamin B6, vitamin C, manganese, magnesium, and potassium.
To prepare: Be sure to select bananas that are very ripe with brown spots as this is a sign that some of the banana’s starch has been converted to a simple sugar, making it easier for baby to digest. It will also be softer and easier to mash. Use a fork and mash by itself or with a little avocado, liver or egg yolk.
6. Butternut/acorn squash with butter
Another easy to digest carbohydrate source is well cooked winter squash. It’s not as starchy as yams and isn’t high in nitrates (more on that below).
Squash is also high in vitamin A, vitamin C, magnesium, potassium and manganese.
To prepare: Cut open your acorn or butternut squash and remove seeds with a spoon. Put on a roasting pan with a little water and bake for 1 hour at 350 degrees, or until the squash is soft and the skin easily separates from the fleshy part of vegetable. Alternatively, you can put in your Instant Pot with 1 cup of broth or water and cook for 7 minutes. Let cool and scoop out flesh. Add in some butter or ghee, which will help convert the beta-carotene into usable vitamin A. Mash well with fork or immersion blender. Serve room temperature.
7. Meat stock or bone broth
Homemade broth or stock contains gelatin, an easy to digest protein, as well as minerals like calcium, magnesium, phosphorus, and sulphur.Broth or stock is particularly excellent at coating and soothing the digestive tract too, which can help strengthen it in preparation for eating harder-to-digest foods (like the difficult-to-digest proteins gluten and casein) later in life.
To prepare: you can find a recipe (with a “how to” video) for chicken stock here.
8. Fermented foods like traditional sauerkraut and whole yogurt
Once baby is a little older, you can add in some sour tasting foods like traditional sauerkraut. Cabbage is an excellent source of vitamin K, but in its raw or cooked state, it’s hard to digest. Fermented cabbage, i.e., sauerkraut, on the other hand, is amazing for digestion. The sour taste stimulates our digestive organs such as the gallbladder and liver. It’s naturally rich in health-promoting probiotics to help colonize baby’s gut with beneficial bacteria—crowding out the bad, and building up the good.
Organic whole yogurt is another excellent food rich in easy to digest protein and fat and rich in calcium, vitamin D and phosphorus. It’s best to wait till 12 months before introducing dairy products (with the exception of eggs, butter or ghee). You can find great grass-fed yogurts at Whole Foods or prepare yourself at home.
To prepare: Make your own sauerkraut, follow this recipe. If DIY isn’t your thing, you can also buy traditionally fermented sauerkraut in health food stores like Whole Foods. Make sure you find it in the refrigerated section and that there is no vinegar on the ingredient list. Vinegar is often added to mimic the taste of natural fermentation—even if the product is not actually fermented (thus not containing any beneficial bacteria). Offer baby a small amount of the sauerkraut juice to get him used to the sour taste. Soon, he’ll love it! “ Source: Mama natural.
food allergies
New research shows introducing common allergy causing foods by 12 months of age and as early as 4-6 months can be a good thing. Eggs, peanuts, and fish are some of these foods. Exposure may reduce the the chance of developing an allergy. You should give these foods regularly (2X per week to maintain tolerance. Start by rubbing a small amount on your babies inner lip and if tolerated after a few hours you can slowly introduce as part of their diet. ALWAYS have Benadryl on hand.
What baby feeding products we love at the Nipple Household
Baby products we love that have to do with feeding!
BabyBrezza Glass One Step Baby Food Maker
As you know, I’m a huge fan of the BabyBrezza products, so their food maker comes highly recommended. We introduced solids at 6 months and I used the BabyBrezza from day one. It is so incredibly easy. You simply put the raw food in the glass bowl, steam, and blend. Whether it’s vegetables, fruit or meat, the BabyBrezza steams and blends the food in one application. The BabyBrezza also comes with recipes organized by age, so you know what foods are age appropriate for your little one. Clean up is also very simple just throw almost every piece in the dishwasher and that’s it! This is one of those products I still use every single day. Now that my son is one, I do not need to blend the foods, but I still use the steamer.
Fresh Squeezed Squeeze Station
This product is a perfect pair with the Baby Brezza. Making all your own baby food has many benefits, but you need a way for your baby to enjoy it on the go, right?! This unit presses your homemade baby food into individual pouches for convenient storage and feeding. Just pour in the puree, press down to fill, squeeze and enjoy. I used this primarily for preparing food when we were traveling or on the go! You can also freeze the packets for your little one to enjoy at a later date.
High Chair: I recommend the 4 moms highchair. The tray is magnetic for easy on and off one handed use. There is also a tray liner you can throw right in the dishwasher or clean in the sink without having to clean the entire tray. The high chair also has bowls that are magnetic that stay secured right on the high chair tray preventing you baby throwing the bowl over the edge. Because the tray liner is so easy to clean, our son’s food goes right on the tray liner. The foam seat is removable and very easy to wash. Overall, I love this highchair for both functionality and its contemporary look.
Inglesina Fast Table Highchair: This is such a great chair to have for both on the go and at home use. We use it at home when we want to have our baby pulled right up to the table. It’s been such a great product for on the go use. Whether it’s a long weekend at my parent’s home or a nice lunch out, this highchair makes eating on the go easier.
Boon Pulp: This is a really fun way for your baby to explore foods and it’s also great for teething! These durable silicone feeders make it easy for your little one to test out fruits and vegetables with its ingenious design and baby-friendly handle, while the easy-clean, dishwasher-safe design makes it parent-friendly, too.
Comotomo Baby Bottles: These bottles have worked really great for us. I love how soft and squishy they are. The bottle features a silicone nipple that mimics feeding at the breast and eases breast-to-bottle transitioning. The wide-neck design makes for easy dishwasher cleaning, while strategic, leak-free vents are designed to help prevent colic. They’ve been dishwasher cleaned too many times to count and they still look brand new.

A MOTHERS JOURNEY FACING A RARE BREASTFEEDING CONDITION
mrs. nipple
Many times being a new mother can feel isolating. There are certain situations you might find yourself in and not know if what you are experiencing is normal. I hope the story below will shed some light around DMER, Dysphoric Milk Ejection Reflex. I had never heard of the condition and now feel like I would be able to identify the condition if I had a friend going through this. The more educated we all are around certain postpartum conditions the more likely we will be able to be a resource for other moms. We all need to look out for each other, during this fragile time. So read on.
jess hohman will take it from here.

Breastfeeding has always been a hard subject for me.
Let me start from the beginning – the birth of my first son, Brooks.
During pregnancy and after delivery, breastfeeding exclusively was the plan. I was fine with deviations from that plan. In my mind, fed is best.
I was ecstatic that Brooks took to nursing like a pro. While nursing him in the hospital, I noticed that I would get nauseous every time that I fed Brooks. I suspected it was the pain meds or other side effects after having an unplanned C-section, so I let it go.
To my displeasure, the feeling continued after we settled in at home. In addition to the nausea, I started having intense emotional reactions when breastfeeding. Not in the soothing, basking in the sunlight rocking your precious newborn way. Rather, I felt terrible unhappiness and irritability, but only when breastfeeding.
For the 30-45 minutes that Brooks nursed I was unpleasant to be around. I snapped at anyone who came into the room or dared to speak to me. It became known that if I was nursing, I was in my room alone to save everyone the pain of being around the monster that I became. And then, once Brooks was done eating, I morphed back into my normal, albeit tired, self.
I had brought up the nausea with my OBGYN, which had been a nonissue to them. I figured this new emotional development would be the same, so I toughened up and powered through…for months.
Once I made it to 6 months nursing my son, which was the goal that I had set for myself, I decided to wean and introduce formula. I was thrilled. I had associated this insurmountable heaviness with nursing, and that feeling was almost gone.

We successfully weaned, and I didn’t think about it again until I got pregnant with my second son when Brooks was just 9 months old. After another relatively uneventful pregnancy, breastfeeding was the goal again. The anticipation of sitting in that darkness for months nursing haunted me.
This time around, my second son, Vance, struggled to nurse a little, eventually figuring it out on his own within a few days. Once again that gloom came every time I popped Vance on my chest for a meal.
I dreaded nursing. I dreaded working through the negativity. I dreaded holding my perfect newborn and feeling anything but pure glee. I felt a terrible guilt associated with my fleeting mental state while nursing. Why could I not feel the way I was “supposed” to feel when I was given the gift of a healthy baby and a body physically capable of feeding him?
One morning 3 months later when I was skimming Instagram stories, I heard someone mention D-MER. A blogger was discussing her breastfeeding triumphs and failures, and mentioned that she knows that there are some women who feel intense negative emotions when their milk lets down. Her message was that breastfeeding shouldn’t be something that you dread, hate, or that makes you feel any less than.
My ears perked up. She was talking about me. Breastfeeding had made me feel less than the perfect mother. During each feeding, I was filled with an irritation that would later fill me with guilt.
After some power-googling that morning, I discovered that D-MER stood for Dysphoric Milk Ejection Reflex. It is an anomaly that affects a very small percentage of breastfeeding mothers with irregular dopamine activity. This means that this condition is 100% hormonal. It is neither a mental illness nor any sort of psychological issue.
I should have talked to my doctor once these symptoms became the norm. However, there is such stigma associated with any sort of mental manifestations that I was instantly shameful. I had already begun to wean Vance because I felt hopeless. I knew that having a happy momma was more important than having an exclusively breastfed child. It devastated me though – I (irrationally) felt like I was starting Vance out in the world with an instant disadvantage.
I learned from my research that this stigma is a large part of why D-MER is not well known even amongst medical professionals. Women are ashamed to speak up about unpleasant things in general, too often opting to appear polite and quiet.
In addition to stigma, every sign in the hospital, OBGYN, and pediatrician’s offices clearly delineate the benefits of breastfeeding for mother and child – decreased risk of certain cancers for mother and decreased risk of allergies and future infections for baby, and passing along antibodies made specifically for your child. What kind of selfish person wouldn’t want to give all that to their child when they are physically able?

I felt an overwhelming guilt. I was so lucky to be able to produce milk efficiently and to have a child who was a good eater. With all that being the case, in my mind I should nurse regardless of the mental toll it takes on me. I should have been strong enough to overcome my side effects in favor of feeding my children.
In reality, I should do what is best for my family as a whole. I am not an island alone whose needs are disregarded now that there are more mouths to feed. I now realize that my well-being contributes to the wellness of the family. And that is something that is not on signs in the hospital.
I hope that this admission of D-MER and all the nasty symptoms that come along with it encourages others to talk to their doctor’s openly. Bring this, or any other condition that makes your well being take a backseat, to your doctor’s attention. Once more people come forward; there will be a stronger justification for research into this condition.
And finally, to the mom struggling through D-MER:
You are doing your best – trying to breastfeed your child and give him the milk that your body perfectly made for him. But if you are feeling depressed, angry, anxious, or generally unhappy ONLY when you’re nursing him, don’t overwhelm yourself by ignoring those warning signs.
Speak to a doctor, and develop a plan for your family. If that means medicine, good! If that means weaning, good! Prioritize yourself so that you are capable of giving that beautiful child all he needs.
This is your journey, and it is beautiful no matter what. I know you’re trying your best, and so does that sweet baby staring up at you.
some more information around DMER
“Dysphoric Milk Ejection Reflex, or DMER, is a condition marked by an abnormal chemical and hormonal reaction that causes a brief but abrupt emotional response at milk letdown. “It seems to be a small chemical reaction that causes a huge emotional reaction,” Alia Macrina Heise, anInternational Board Certified Lactation Consultant in Naples, New York, who pioneered research on the condition.
For milk letdown to occur, the hormone dopamine — which controls the secretion of the hormone prolactin — must fall so levels of prolactin can rise. Yet for mothers with DMER, a chemical imbalance or dysfunction of dopamine prevents that from happening.
Symptoms of DMER vary, but they typically include anxiety, irritability and sadness. Some women may even have suicidal ideations. “This is like being zapped by a dark cloud — it can be very overwhelming and scary,” Diana West, an internationally board-certified lactation consultant and director of media relations for La Leche League.” FN
DUDLEY STEPHENS X MRS.NIPPLE
Maternity & Postpartum
I know many of you are on the hunt for that perfect fall piece to add to your mom uniform. In my opinion Dudley Stephens is it!
Co-founders Kaki Mcgrath and Lauren Stephens created the idea for Dudley Stephens when endlessly searching for fleece that could be used in a fashionable way. Growing up in New England towns they lived in fleece jackets year round. "Fleece was the perfect solution for warmth and comfort, while being easy to wash, environmentally friendly and stylish." Dudley Stephens designs and creates stylish silhouettes using fleece fabric that are comfortable, easy to wear, and that look and feel good. Kaki and Lauren are both local moms and as a team they have a wealth of experience in both the fashion and marketing world.
Though the Dudley Stephen’s line is not maternity/postpartum specific every one of the pieces works well for both pregnant and postpartum moms. They even have the most adorable little girls fleeces as well.
Before I get into why I love Dudley Stephens I wanted to share a 20 percent off code that the co-founders agreed to make available to you for today only. Use the code MRSNIPPLE20 for a one time discount of 20% off your ENTIRE order
You can find out a few reasons below why I love Dudley Stephens but I would like to take a minute to talk about how certain features are very important for pregnant and new moms.
When I was pregnant I lived in leggings, my main concern was comfort. The Dudley Stephens Cobble Hill Turtleneck is perfect during pregnancy and beyond. It is super slimming and gives you the perfect amount of coverage hitting below both the butt and upper thighs. The upper thighs seem to be my problem area post baby and this cut does wonders for my confidence.
I also love the Pacific Vest in Double Layer Vello Fleece, Chrissy from In My Closet Blog, is it wearing below. You can throw it over anything and still accomplish both that slimming and pulled together look. It’s also perfect during pregnancy and will take you from pre-pregnancy through delivery to post baby.
The Brooklyn Bomber jacket is another one of my favorites. It’s perfect for both breastfeeding and baby wearing. It also happens to be the most comfortable thing on earth. The brushed fleece is so soft.
As a mom with young kids I always think about the fabric! My boys have sensitive skin and wearing something soft that’s made right here in Brooklyn makes this line that much better. “It’s crafted there with sustainable, non-iron vello fleece (read: super soft, non-wrinkling, easy wash) spun from recycled yarn.”-ds
Check out some styling tips from Chrissy (In My Closet Blog) & myself below. Take advantage of the discount code at the end of this post! Dudley Stephens very rarely offers a discount this good.

“As a busy mom with one more on the way, I get dressed on the go, which can be quite the challenge—so I have a few go-to pieces I can throw on and walk out the door feeling put together. The Cobble Hill is definitely one—the length is perfect for moms and easily fits my growing bump. I love how I can wear it with leggings and sneakers one day and skinny jeans and cute flats the next." -Chrissy, In My Closet Blog


"Another favorite: the Pacific Vest. Talk about the perfect layering piece, especially over my large belly. It effortlessly pulls an outfit together; I love pairing it with a button-down top and jeans. The best part about my DS pieces is that I can continue to wear them post baby!" -Chrissy, @inmyclosetblog

“Confidence after giving birth can be a struggle, but the Dudley Stephens line is the perfect postpartum uniform. Not only does the material hold up incredibly well after spit-ups and other mishaps, but the pieces are just as functional (pockets!) as they are beautiful, something every new mom needs."

"Many have a length that’s extremely slimming for the postpartum body, while still providing easy breastfeeding access—and your newborn will always feel cozy against the soft fleece."

If you will be baby-wearing this fall, the Brooklyn Bomber is a must! My five-month- old fits perfectly, all warm and cozy underneath, and I had both hands free during our recent apple picking trip.

HERE ARE MY PICKS:
You can click on anything in bold to check that specific product out.
The Brooklyn Bomber jacket: Caramel brushed fleece
The Cobble Hill Turtleneck ( for a little more coverage) or the Park Slope Turtleneck for a short look, perfect for tucking. My favorite colors are, navy, red, island coral, heather grey, marigold, green, burgundy and natural blush…I love them all!
Pacific Vest in Double Layer Vello Fleece: I love this for layering. Both the navy and brushed black fleece are on my list.
Remsen Blazer in Double Layer Vello Fleece: Love this look and the Tilden Turtleneck Dress especially for the holidays and the office.
SIZING
PREGNANT MAMAS: I would size up at least one size. Doing this will allow you to grow into the fleece yet you will still be able to wear it postpartum.
EVERYONE ELSE: Think about how you want the fleece to fit. I ordered the Brooklyn Bomber jacket in a small and it fits perfectly. I also ordered the black Cobble Hill Turtleneck in a small. I don’t mind the more fitted look with the black but when I order my next few (today) I’m going to go with the medium because I like to have some room. I’m usually between a small and medium because of my broad shoulders.
Use the code MRSNIPPLE20 for a one time 20% off your ENTIRE order from 6am-midnight today only.
BIG ANNOUNCEMENT
Now for my fun announcement! As I mentioned earlier Dudley Stephens is run by two moms and they are an inspiration to other moms trying to create something in the entrepreneurial space. That being said, I feel like this is the perfect opportunity to announce the name for something I will be launching in February. I did an instagram poll last week presenting both names for my future business, Mom Friends by Mrs. Nipple vs. Mrs Nipple & Co. Many of you also gave me your ideas which cracked me up! Some of my favorites, Nipple Nation and The Daily Nip. It was a landslide and it seemed like everyone wanted to keep the nip front and center so it will be called, Mrs. Nipple & Co.! As always thank you for your continued support on this journey.
xx
Mrs. Nipple
HELLO FALL
My recent fall shopping trip & my fall wardrobe staples

Check out a few finds from a recent shopping trip + my fall staples from previous years. I included photos of myself in some of the pieces below each category. At the end you will find all the products.
DENIM:
I wasn’t really on the hunt for denim because I’ll be living in THIS pair for the rest of the fall but I came across the pair of awesome wide leg cropped jeans below. I fell in love. They look great with a pair of cool sneakers or booties. I’ve never purchased a pair of jeans this cheap and I’m so impressed. I would say they are true to size and need be washed often because they do stretch out. You can shop them below under denim.
2. SWEATERS:
Ok this is what I was really on the hunt for. H&M did not disappoint. I’m not sure if they changed some things around at manufacturing but the quality seemed much better than previous years. I tried on and purchased all of the sweaters below. I love every single one. I love the look of a chunky sweater tucked into wide leg jeans like the ones above.
3. VEST: My favorite purchase from last fall was this really cool long sweater vest. Also perfect for breastfeeding. I was pretty upset because it sold out right after I bought it and I wanted to buy it in one more color. I have the green/navy reversible vest and the tan is on my wish list.
4. BOOTS:
ALL WEATHER WEDGE BOOTIES: I love my pair of all weather wedge booties. I bought them in black but also love the brown. I wore them all fall/winter long and they still look great.
RAIN BOOTS: I bought my first pair of Hunter rain boots ever last year. I basically waited so long because I think they are pretty ugly. I just hate when you walk in them and they bend and change shape in the strangest ways. That’s until I found the ultimate Hunter rain boot. The Norris Field Neoprene Lined Hunter Rain Boot. These are your average hunter boots on crack. They are made from a new soft rubber compound that maintains strength, while being flexible to allow ease of movement. Meaning your legs wont look like they are made out of play dough. You can find my full review of them, HERE.
BOOTIES: These booties are my favorite for fall. They wore beautifully and I can’t wait to rock them again this year. Last year they sold out very quickly so I would grab these ASAP. You can shop them, below.
OVER THE KNEE BOOTS: OBSESSED. So obsessed. I’ve been looking for a good over the knee boot for years and I can’t wait to pair these with beautiful flowey dresses and skirts. I wore them through last fall and they are still looking great. WORTH the price tag.
WEDGE SNEAKER: I love this camo print wedge sneaker.
JACKETS
RAIN JACKET: I bought this for Ireland and it did not disappoint. I absolutely love the material, it holds it shape perfectly no matter what. You will look completely tailored in this rain jacket, even when it’s pouring buckets.
SUADE JACKET: I love everything about my Blank NYC suede jacket. Black for the winter brown for the fall. It’s such a great staple that won’t go out of style.
LIGHT WEIGHT JACKET: I’m not a brand person but my Barbour jacket was such a good purchase. It is so sharp looking. I still love it just as much as the day I bought it.
COAT: You know that one piece of clothing people stop you in the street about? I bought a J. Crew color block coat a few years ago and I cant tell you how many times I’ve been stopped about it. The navy coat below is up there is my opinion with my color block coat. I plan on ordering it soon as sizes are running low.
SKIRTS: This classic faux suede skirt with buttons up the center looks so great with the over the knee boots above. I also love the flowey flower print skirt you can rock it with booties or sneakers and a chunky sweater with a slight tuck. perfection!
DRESSES: I love a flowey dress with over the knee boots and a fall vest or chunky sweater/cardigan. You can find some pictures of ones I wore last fall below. I can’t find my favorite from last year but this is similar, HERE.
HATS: I love hat attack for everything hats. You can find my favorites below.
DUDLEY STEPHENS will be my new go to for everything fall this year. I’ve been wearing my pull over and new bomber a ton. check back on Thursday for an awesome collaboration.


DENIM

SWEATERS
SHOES
SKIRTS
VEST
COATS
HATS
DRESSES
PPD AND THE LOSS OF A BEAUTIFUL SOUL
This is kara’s story through her sisters eyes
This is such an important topic and a checklist in the doctors office is not enough for diagnosis. Postpartum depression is a real mental illness. There is a need for educating families, loved ones and mothers around what to look out for and for being able to differentiate what are normal emotional fluctuations from what should be addressed by a professional. There is a real lack of education from our medical system. Please read this and help Lauren and her family spread the light.
Here is kara’s story told by one of her sisters, Lauren.

Lauren will take it from here.
You can’t change the past, you can’t change the future and you can only change the present one moment at a time.
Never have I wanted more than to change the past, to go back and undue what was done. To wake up every morning and just for a second before I open my eyes try to imagine that things were different. To go back and do things differently, to see things differently, but we can’t, we can only move forward.
My sister, Kara (Morrow) Kovlakas was a vibrant, outgoing and loving mother, wife, daughter, sister, aunt, niece, cousin, teacher and friend. No one loved life more than Kara, she was always the brightest light in any room. She was born 22 months after I was and as children we fought like most sisters do, but as adults she was my best friend, my closest confidant. We were each others maid of honor, we drove cross country twice, traveled too many times to count, we share a lifetime of memories.
Already a mom to her daughter, Aydan who was born in September 2012, she had her son, Ari on January 14th, 2016 and it was one of the happiest moments of her life. For the first few months after Ari was born, Kara seemed so full of life and energetic. As any mom/parent knows, juggling two kids under the age of 4 is a difficult task on all days. She had doubts and moments of struggling but seemed to be able to pull it all together.

Then in early August 2016 that all changed. Kara’s thoughts became jumbled and confused. She would talk herself in circles and have endless doubts about what kind of parent she was. There was a cloud of sadness/darkness that was following her everywhere. She couldn’t see past her current mood at most times, she was only seeing the negatives in life. She was taking out her pain on her husband and children. Kara struggled with anxiety her entire life, she was seeing therapists/doctors to seek treatment/medication but to what extent that played into the end result I am not sure we will ever know.
By September, Kara had returned back to teaching her 3rd grade elementary class after having been on leave since having Ari. We thought this would help, she thought it would help. She was talking about the future and how things would be better when the kids were older, when they had more money, etc. She continued to express positive thoughts about a future time but couldn’t find happiness in the present day. We thought she was getting better, trying to find a happy place again.

On October 13, 2016, Kara left the house in the morning, kissing her husband and sending Aydan off to preschool with her Mimi (Kara’s Mom) and then dropped Ari off at daycare like it was any normal day. She waited for her husband to leave the house before going back home and ending her life. She would have turned 33 years old the following day. I don’t want to refer to it that she ‘committed suicide’ - she resorted to suicide, which she perceived, in her unwell mind, to be the only possible solution to her tremendous suffering.
We found out later she had called out sick from work the night before. She had planned this. The day before she had a great day with her children and seemed happy. I live 3 miles down the road from her house and I was home all day. Kara and I have 4 other sisters who are her best friends. We had been supporting her as a family. My mother was helping her get out the door every morning by taking Aydan to school. Anything we could do to ease the burden she was feeling. We offered to check her in somewhere, but she refused. We had wanted her to seek more treatment but she convinced us she could handle this. She convinced us she was getting better. Her husband was supporting her every step of the way in whatever choices she was making. She was seeking outpatient treatment. She had a lot of support, more support than most people ever receive.
Kara’s story needs to be shared so that people understand postpartum depression is a real mental illness. I am not sure what Kara was feeling or going through but she was depressed and had anxiety. From what I have since learned about postpartum depression, in extreme cases it can lead people to have psychotic thoughts - the term is postpartum psychosis. I don’t know if this is what she had, she was also taking medications so that could have added to her compounding issues.
If I were being honest with myself I know that the depression and anxiety was present long before Kara was a mother. I have spent everyday since she left us struggling to understand why she chose this and trying to move forward in this world without my sister and best friend. I am a new Mom also and have needed to call her a million times to ask her advice. She was an amazing mother; she always seemed to know what the right thing was when it came to her children. I will never understand how she could leave them.
But here we are. This is the new world we all live in. As a family, it is our job now to help her husband take care of her children. To make sure they grow up surrounded by love and security. To make sure they know how much their Mom loved them. To share our memories of her and keep her alive in the only way we have. We need to figure out how to live the rest of our lives without her. We are all forever changed by her decision, we will never be the same. We will never take a picture of the 6 sisters again.
It is our job to talk about Kara and share her story in the hopes that we can try to help other families from not going through a tragedy like this. This can happen to anyone. You never know what someone is struggling with on the inside but new mothers in particular are vulnerable and we all need to be more aware. Don’t be afraid to ask the hard questions. How are we really feeling? How are you really doing? What are the signs that you should be on the lookout for? This is a great place to read up on postpartum depression if you aren’t sure. Click, HERE.
“Place your hand over your heart, can you feel it? That is called purpose. You’re alive for a reason so don’t ever give up.” – Unknown
Shortly after in August 2017, my family and I launched ‘Light for Kara’, an advocacy and informational website, with the hope that by spreading awareness and sharing Kara’s story we can prevent another family from suffering the tragedy of losing a loved one to this treatable mental illness. If you would like to read more about Kara’s story, and my family’s journey to spread awareness about perinatal mood disorders, please visit our website: LIGHT FOR KARA.
In continuing with our mission, we are hosting the first annual Light for Kara 5k for Maternal Mental Health, a 5k/1 mile walk/kids fun run, on Saturday, October 13 (full details below). We have partnered with Postpartum Support International - CT Chapter (PSI-CT) to raise money in support of the wonderful work they do throughout CT helping both mothers and their families. We also plan to donate a portion of the proceeds to Malta House, a Norwalk based women’s shelter that supports pregnant and parenting mothers. Both groups are registered non-profits and donations are tax-deductible.
We would love for you to join us as a runner, walker, or even as a volunteer. In the event you are unable to attend but would consider making a donation, you can do so through our 5k website. If you know of anyone who may be interested in participating in any way, or even learning more about Light for Kara, please feel free to forward this email.
Light for Kara 5k for Maternal Mental Health
Saturday, October 13, 2018
7:30am Registration | 9am Race
Calf Pasture Beach, Norwalk, CT
Thank you for your unwavering support,
Lauren Morrow Shrage
on behalf of Kara’s Family - August 2017
FLAT HEAD SYNDROME & BABY HELMETS
THE MRS.NIPPLE SERIES X ARTICLE 2 DEVON
This is a topic I have always been curious about and another reason I'm so grateful so many moms are sharing their stories. If you have ever wondered why some babies wear helmets or are starting to notice your baby’s head taking on a less than round shape then this is a must read. Yet another story about the power of a mother’s intuition!
I'll let Devon take it from here:
The doctor entered the room, “Plagiocephaly as a result of torticollis.” My husband and I just looked at each other. “Sorry but English is our first language.” The doctor laughed, “He has an asymmetrically flat head from stiff neck muscles.” Ah, okay, that we could understand.
Rewind 3 months earlier when we welcomed our first child into the world. I didn’t have a difficult labor, as in no long drawn out process of pushing for 72 hours or anything crazy. However, I did have an epidural so I was basically chillin. When the time came that I needed to begin active labor and push, it came to my doctor’s attention that our son was transverse. Typically a doctor will see this and call for an emergency c-section, but my husband and I made it very clear that we wanted to avoid that by any means necessary. Thank God our doctor was old school, the type that wore the same small yellow round frames and a bowtie to every appointment and I like to think every delivery under his scrubs. In any event, he knew the method of flipping the baby while still inside the mother’s birth canal and ensure he came out head down. After a successful flip, our sweet boy entered the world and he was absolutely perfect. He always looked so peaceful when he slept, his head tilted slightly to the left and swaddled just right by his daddy who really should be in the Guinness Book of World Records for swaddling babies.
We had been home for about a week and like with all first born babies, it is a life altering adjustment for everyone. However, the silver lining was that he was a decent sleeper. He would sometimes sleep for four hour stretches and he loved to doze in his swing and carseat. Looking back at pictures, I’m not sure how we missed In every picture of him whether he is awake or sleeping, he always was comfortable with his head tilted to the left. After about three weeks, kI was giving him a bath and I noticed the back left side of his head seemed like it was a bit flat. My husband agreed but when we brought it up to our family they passed us off like we were just worrisome first time parents. “Don’t worry, it will even itself out.” That was the common statement all of our friends and family members gave us. But the more the days went by and the more people said assured us, the flatter it seemed to be getting.
I remember vividly, it was Mother’s Day and my mother-in-law took me to the local nail salon for a pedicure. Looking back maybe it was a sign from the universe. I'll never forget the owner of the salon walked out from the back room and as he walked by the back of his head was the flattest I’ve ever seen, the equivalent to a 90 degree angle. Not kidding. I remember looking at my MIL and crying saying “I don’t want him to have a flat head!” She reassured me he wouldn’t and that he was still young and it would “round out.”
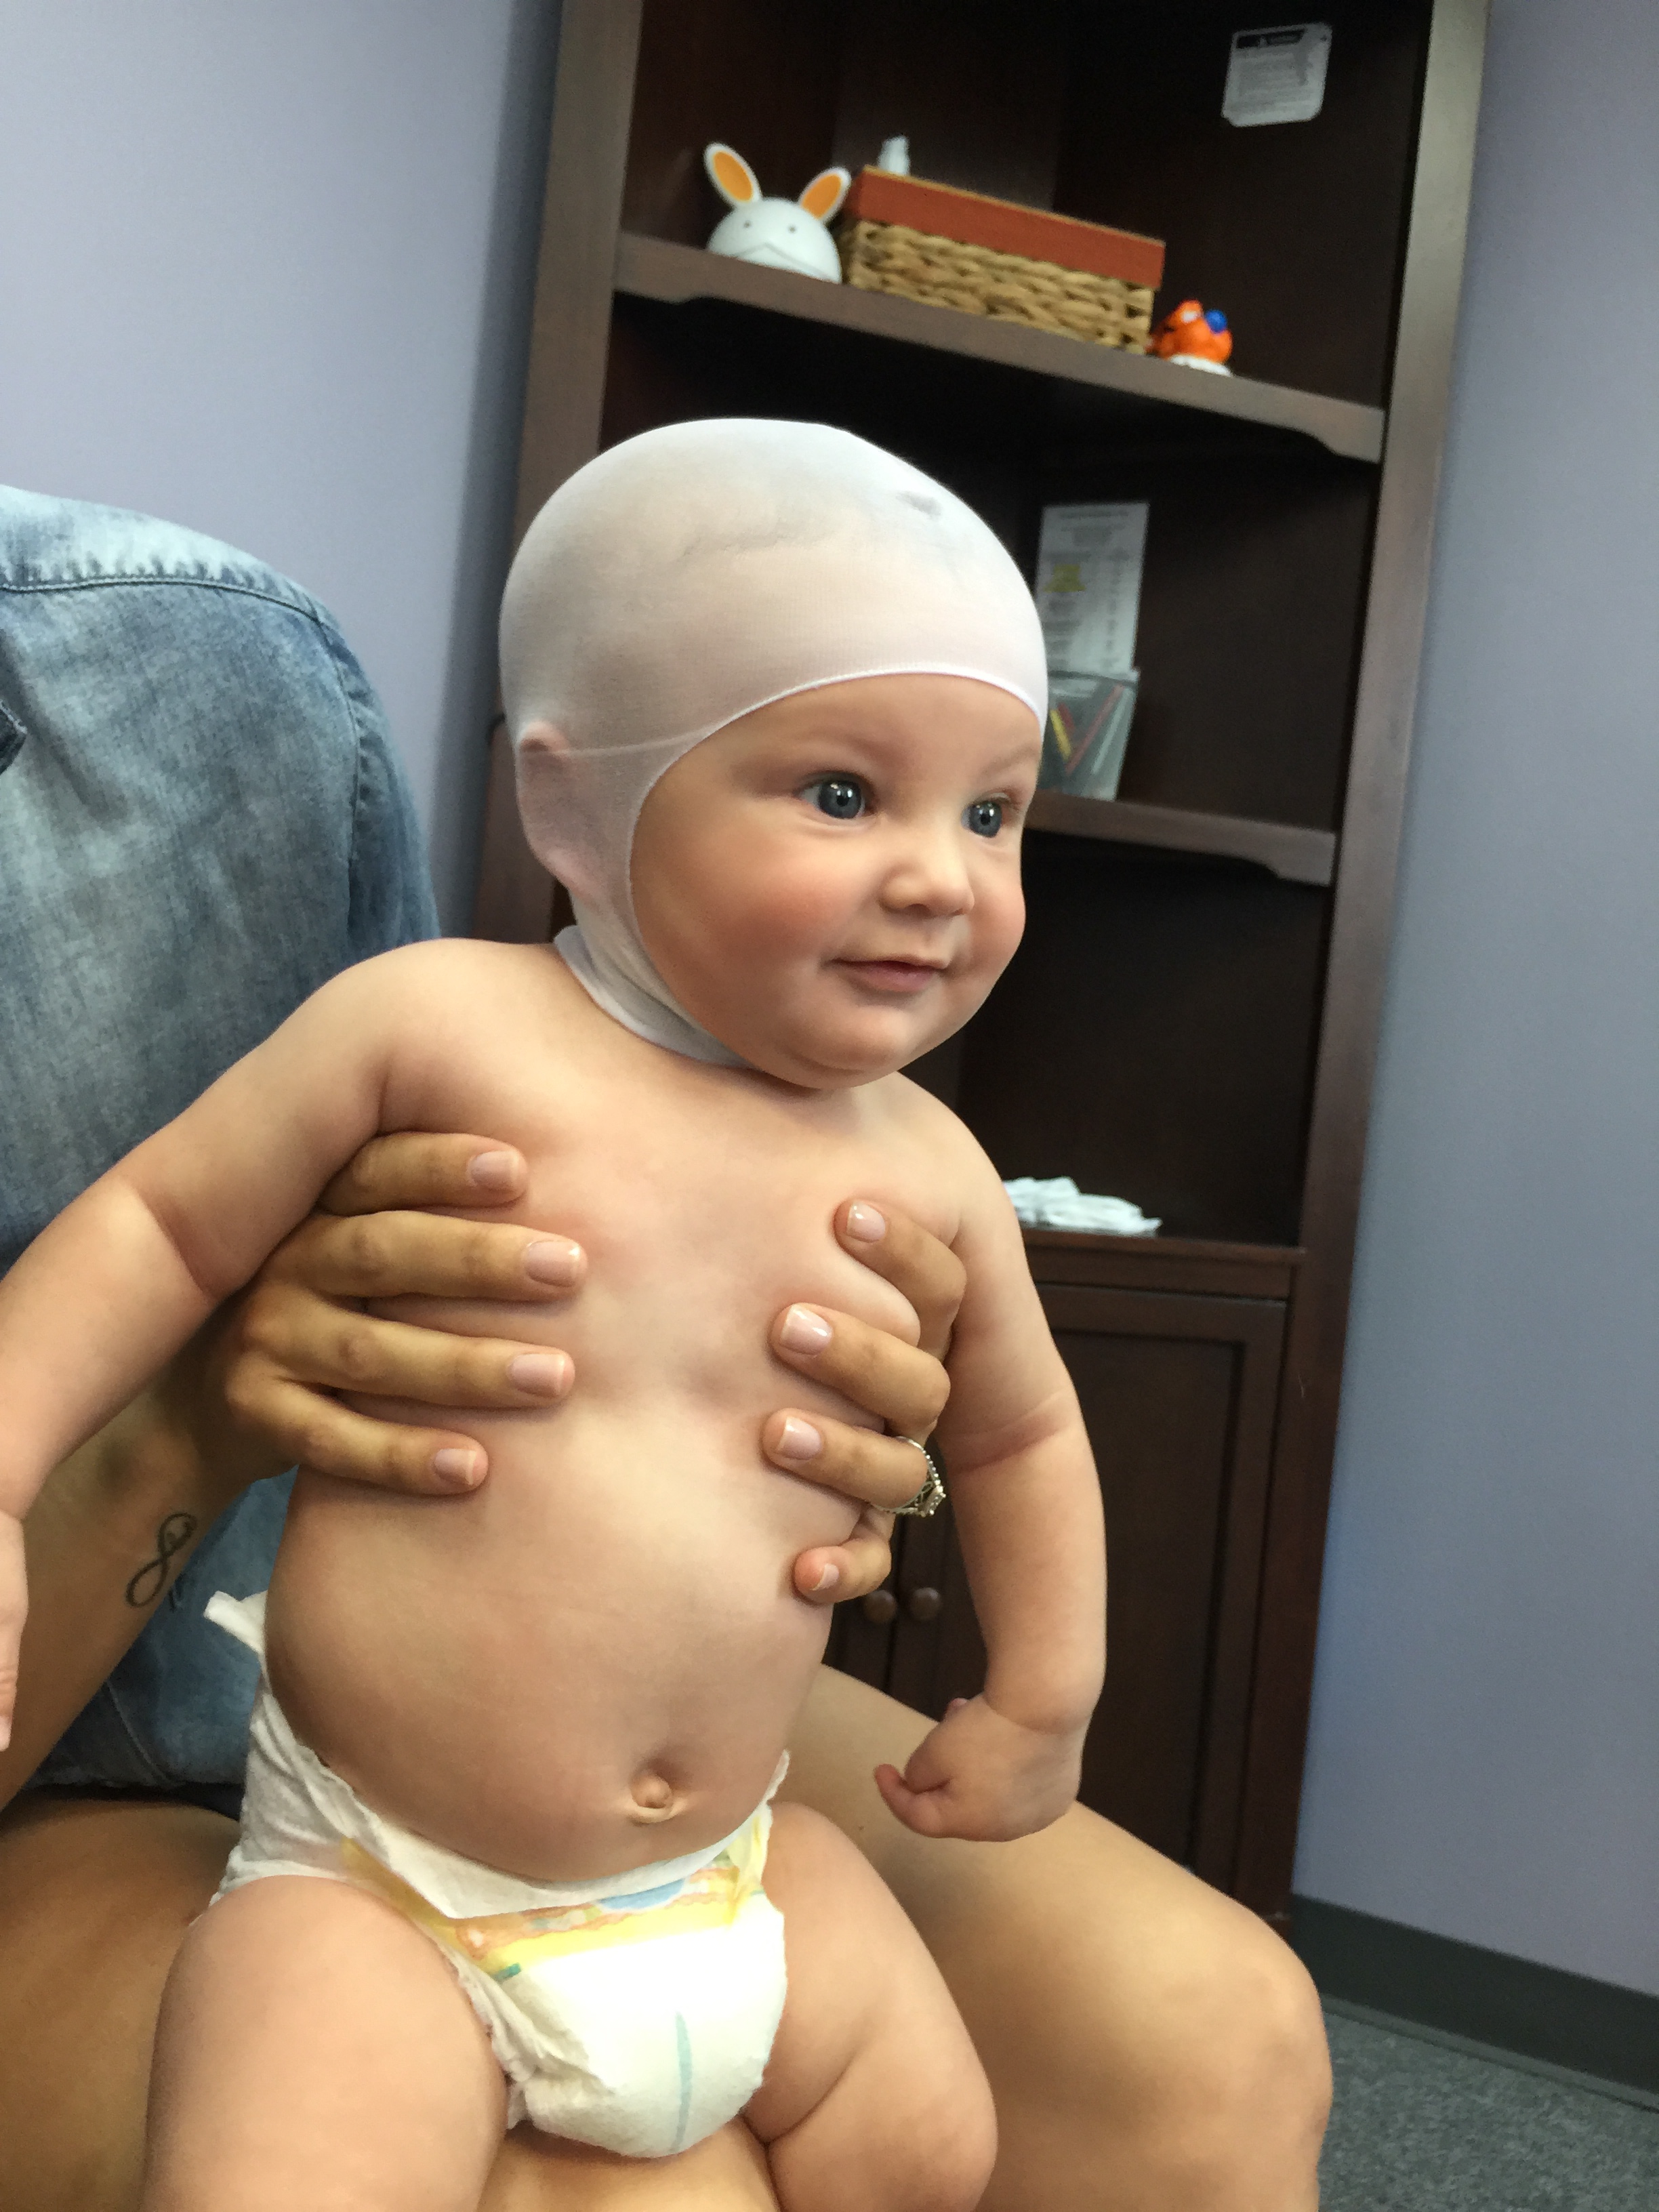
The next day I called and made an appointment with a doctor’s office called Cranial Technologies. They specialize in identifying and treating babies and children with various forms of plagiocephaly as well as providing a safe and effective Dynamic Orthotic Cranioplasty, otherwise known as the DOC band. My husband and I did not know what to expect at our initial eval and had never even heard of a DOC band before. All we knew was we were going to show the doctor our baby’s head and hopefully get some confirmation that we were not crazy and that our baby’s head really was flat.
The first step, aside from just checking our baby over, was to have some imaging done of his head. This is the cute part. They put a little ped type thing on his head and sat him in a chair, although at just 3 months old there wasn’t much sitting on his own so I had to hold him up. Then they start taking 3-D images of all angles of his head to be able to see more clearly than by the naked eye. After about 10 minutes of imaging, we were back in the room waiting for our doctor. She came back in the room with the images of our son’s head in her hand. “So how does it look?” my husband asked reluctantly. “He has a severe case of plagiocephaly as a result of torticollis.” I'll never forget the feeling I had when she said that, it was a mixture of relief, guilt and sadness. She showed us the images and we could easily see how badly shaped his head had become. The more pressing thing according to our doctor was that because he had flatness on the side of his head and not in the back, it was beginning to change the shape of his face. The flatter it became the more his left cheek started to protrude. The minute we were shown the images, I saw it all and I couldn’t unsee it. I remember crying a little and I think my husband was in slight shock but we both knew it all along.
The good news was he qualified for the DOC band and we could get the process going immediately. The band is really just a little helmet that is designed specifically to your baby’s head and stays on 23 hours a day, with the exception of bath time, no matter what. It is designed to apply custom pressure on various areas of the head to redirect the natural growth of the head into a normal shape. The amount of time each child has to wear their helmet varies based on the severity of the case.
Treatments usually start when the child is between the ages of 4-6 months and can last until they are 18 months of age. For some children a second helmet is recommended for maximum benefit. The difficult part for me was the amount of time he would be wearing the helmet. My poor 3 month old baby has to wear this helmet all day, everyday, for the next 6 weeks-4 months! Summer was just starting and this poor kid was going to be sweating! To my surprise, he did much better than I thought. I imagined he would be pulling at it and crying, but he didn’t. So this began our new normal.
Every week we would go back to see the doctor and she would measure his head and make regular adjustments to the interior of the helmet to direct head growth and ensure we would see optimal results. Believe it or not, the helmet is super light weight and didn’t effect him or his play at all. We got used to seeing him in it and used to seeing all the weird looks from strangers. People thought he had some sort of disability and when they asked, we would reply, “Oh, he’s fine. He just had a flat head!”

In conjunction with the regular DOC band appointments, we were also attending weekly physical therapy sessions to help with the torticollis. The goal here was to loosen up the tight left neck muscles and strengthen the right side that was weak. This part was equally as crucial because if we didn’t fix the torticollis he would continue to lie on his left side and his head could potentially begin to flatten again. After 5 weeks of PT sessions with the doctor and daily home workouts, we saw a huge improvement in his posture and an improvement in his sleeping as he now was able to roll over.
The DOC band is basically a very plain, white helmet. My husband and I were shown some helmets that parents had decorated with stickers and writing but my husband knew exactly what he wanted to do. We were making this a football helmet! Against my better judgment, I let him choose his favorite team, which is unfortunate because my favorite team is better but that’s a another story. We found a really cool guy almost a mile down the road from our doctor who does vinyl custom wraps on everything from cars to lap tops so we thought why couldn’t he design a wrap for our helmet? It was his first DOC band he ever did and it came out better than we could have imagined! People would come up to us after we had it wrapped and said, ”Oh my gosh what an awesome helmet! Where can I get one?” We always laughed and would say that they definitely didn’t want this type of helmet, but it always made us feel better when people would be so complimentary.

About 7 weeks had passed since he had been wearing his helmet and we had a routine doctor’s appointment. I remember being in the office and our doctor came in to take the measurements of his head. She was so shocked to see how far along his progress had come and wanted to do another round of imaging. We had more pictures taken and after looking at the images, our doctor was amazed. His head was almost perfectly shaped. She said it was the fastest adjustment she had ever seen and that we would definitely not need a second helmet. In fact, he would most likely be out of the current one in another 2 weeks. I couldn’t believe it! In just 7 short weeks his head was almost perfectly shaped!
We went back two weeks later to do our final consult and more imaging. The doctor provided side by side images from when we started to where we were now and my husband and I were astounded. Seeing what his head looked like when we began to where we were now was night and day. Our doctor was so pleased with his progress that she asked if she could share his before and after photos with future patients because this was one of the best results she had seen in her 27 years of practice. We,of course, said yes and left the doctor that day helmet free.

Looking back, it was the best decision my husband and I ever made. I think sometimes if we had listened to our family and friends we would be in such a different place today. I see him running around now at 3 years old with all his hair grown in and you would never be able to tell that anything was ever wrong with him. That is the best part of all of this. We trusted our gut and came together as a team to do what was best for our child and family and we could not be happier.
Devon @devondiaz11
Please see this article for more information around plagiocephaly, HERE.
If you are interested in getting your babies DOC band decorated you can find DJ Brown's information, HERE.
BREASTFEEDING WITH INVERTED NIPPLES
THE MRS.NIPPLE SERIES X VOL. 1 RUBY
Kicking off the Mrs. Nipple new series with our first article coming from Ruby @Rubixcube17 with her experience around breastfeeding with inverted nipples. I really love this piece and hope it spreads awareness.
Enjoy!
Xx
Mrs. Nipple
Ruby will take it from here:
It's not something that's spoken about often, to be honest I didn't even know it was an existing issue until I realized I in fact owned a pair of breasts with flat/Inverted nipples. Let me start at the beginning. When I found out I was expecting I was over the moon, and immediately started reading all the "what to expect" books. I wanted to be prepared, and succeed in things important to me, the main one being Breastfeeding. I knew it was going to be hard, I was prepared for the sleepless nights and long feedings, but I had also read countless times it was natural act between mother and baby and of course, breast is best. I was determined, I was ready - I was not prepared to be let down by my own body. My breast feeding journey only lasted 4 weeks, and was full of challenges. Cracked nipples, multiple bouts of Mastitis, undiagnosed lip and tongue ties, small baby who struggled to latch and put on weight and finally, one flat nipple and one inverted nipple. Believe it or not, I didn't even know until I had already given up Breastfeeding. How did this happen you ask? It's because NO-BODY speaks about this affliction! A flat nipple is where you have no protruding nipple from the areole and an inverted nipple is where it is pulled in towards itself- basically the baby has nothing to grasp on to.
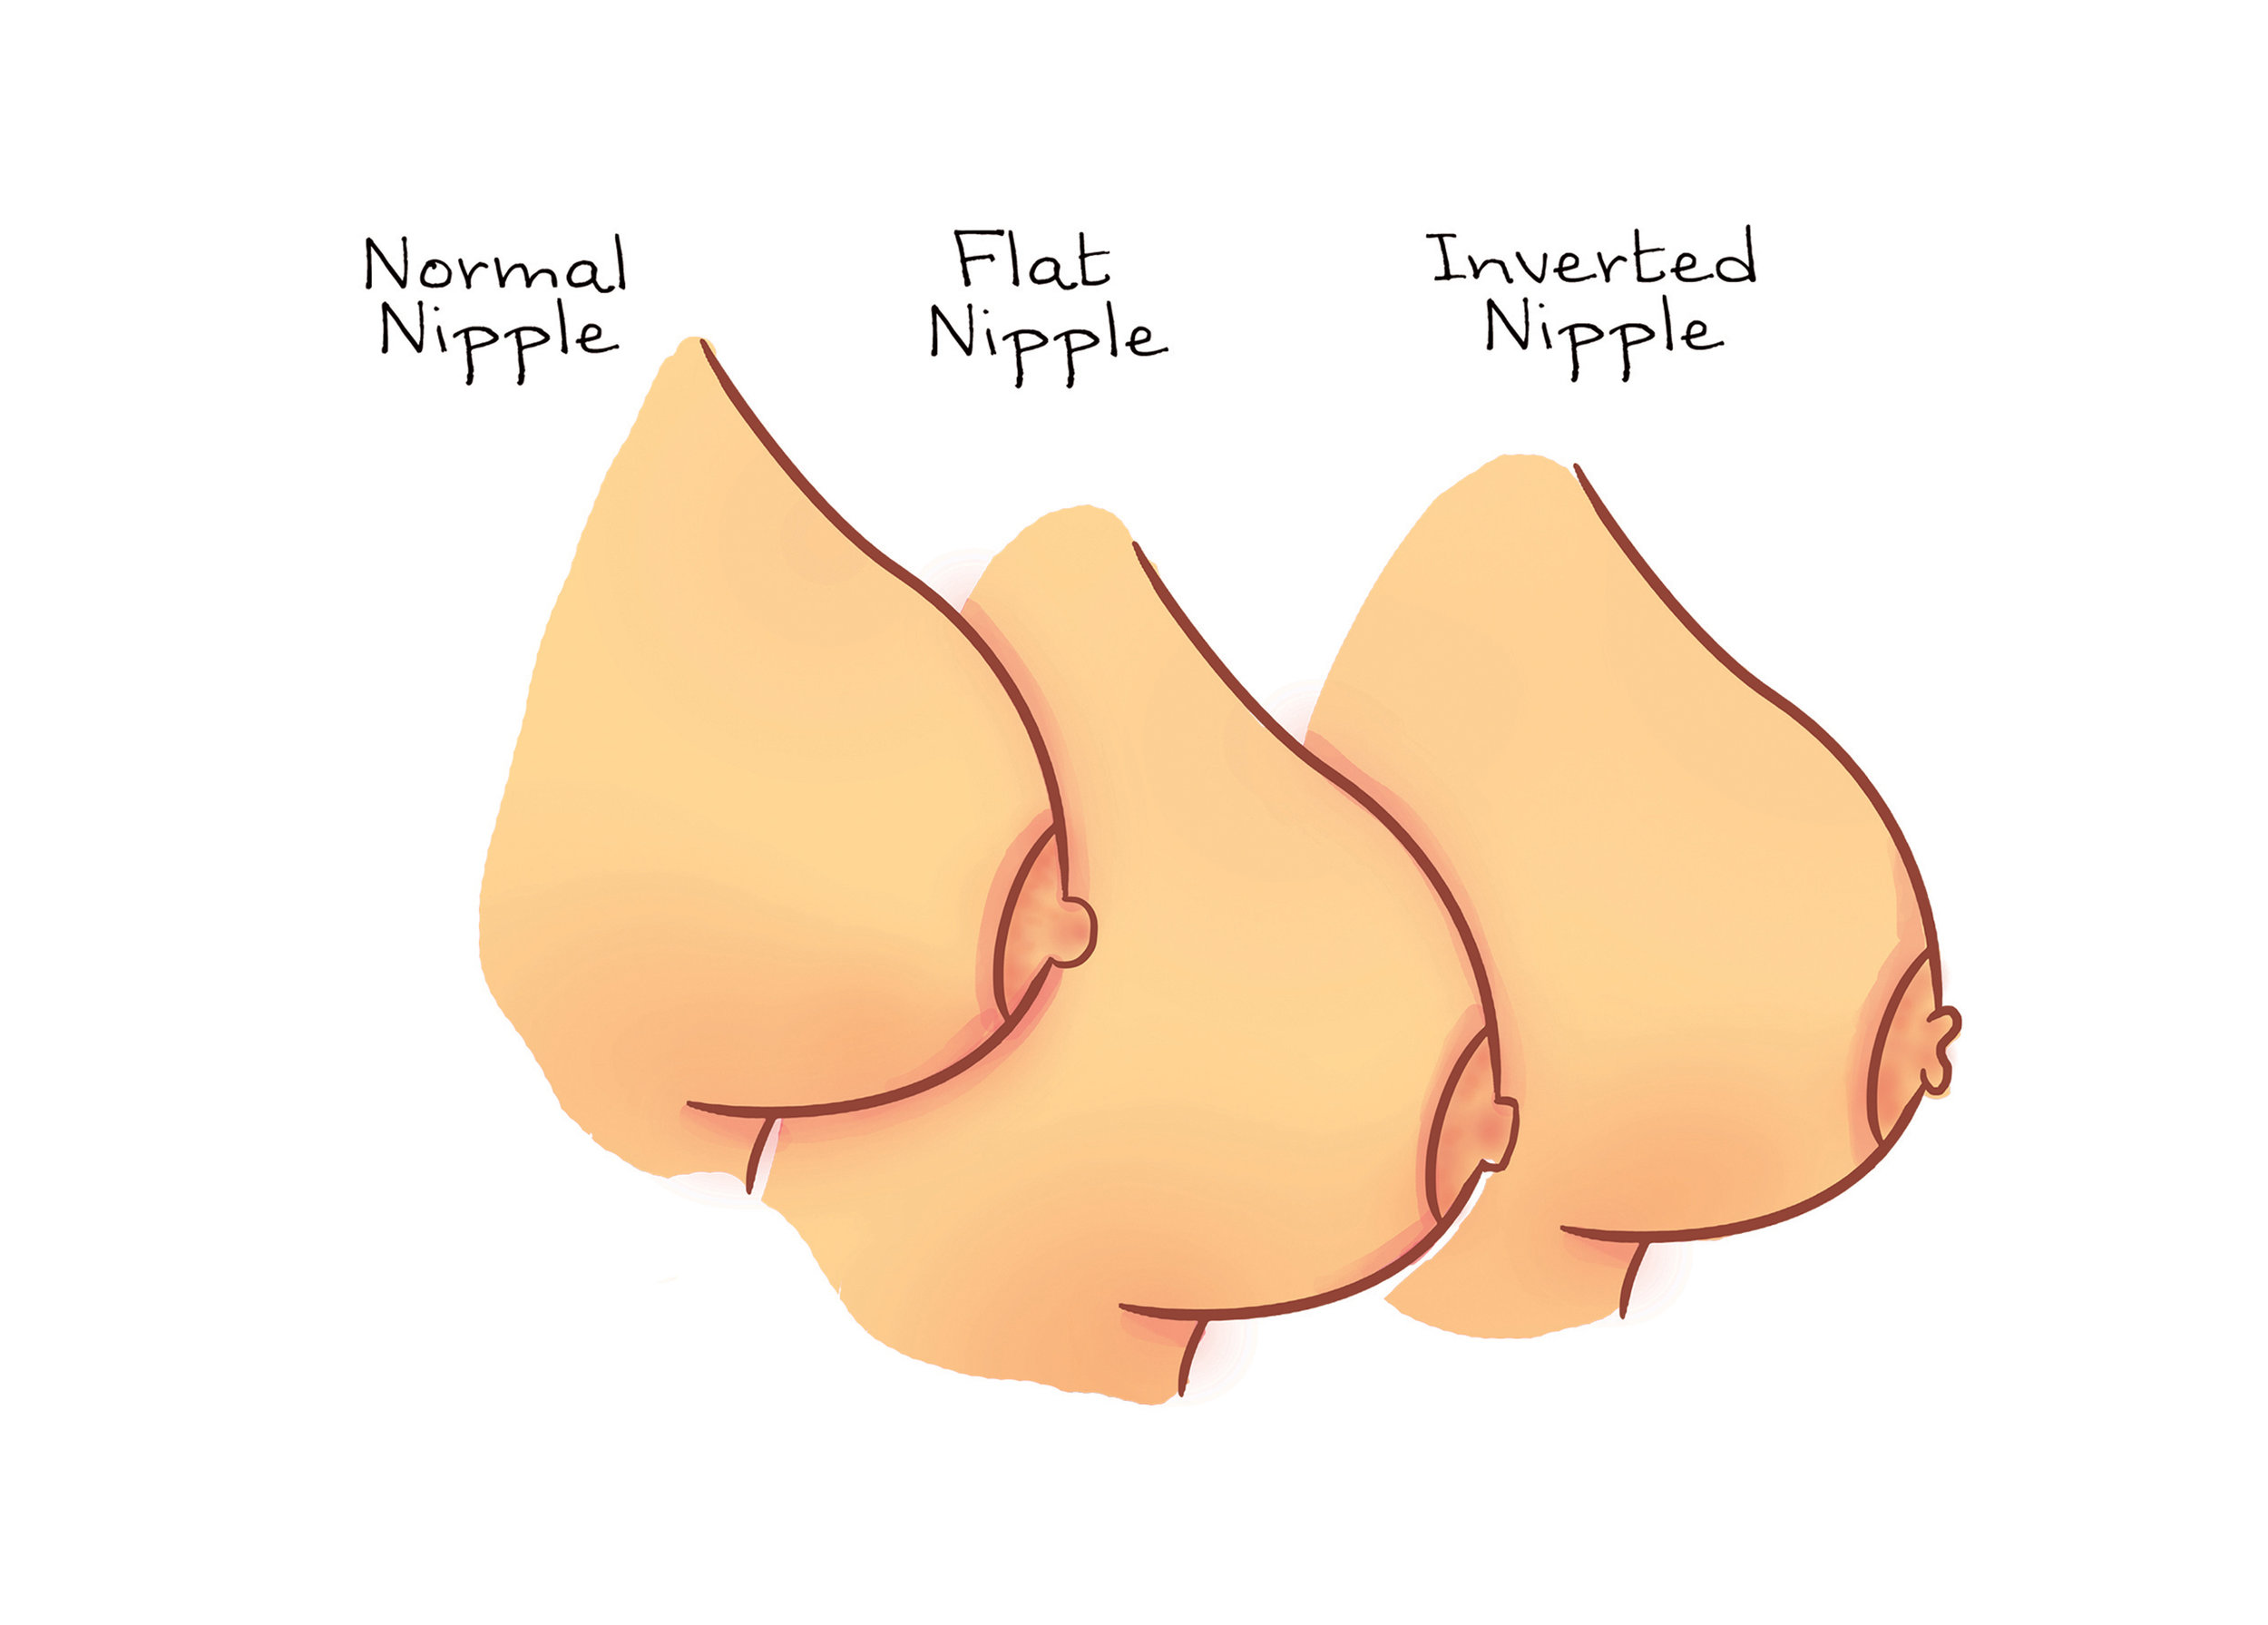
I had noticed during my life my nipples never seemed to "stand out" as I had noticed other women's do so through their tops, but to me this was a good thing, convenient even as I could go bra-less in outfits no worries- never did I think I would see the day I was jealous of how much a women's nipple would protrude.
Our first feed after my daughter was born she wouldn't latch, and when she did it was hurting like hell. The midwives weren't worried and told me she would get it. Next 3 feedings I had to be hand expressed for colostrum as my daughter still wasn't latching, and even then the midwives did not mention that anything was amiss with my breasts. I persevered an eventually got her latching, despite how much it hurt I was determined. 12 hours later I already had 2 cracked nipples, by 3 days old I was already at the GP for mastitis, then a lactation consultant. It was here I was introduced to nipple shields. These are basically very thin pieces of silicone that suction your nipple in and created more of a shape for your baby to latch onto.

I later learnt (too late) nipple shields are a great tool for people with flat/inverted nipples however they were given to me to give relief from the cracks. Again, nothing mentioned about my breasts, I was oblivious. They put the mastitis down to my daughters shallow latch (again, due to undiagnosed lip ties, these two problems made breastfeeding next to impossible) and told me she would learn to latch with the shields, and then I would need to wean as they were only a short term solution.
And so we entered 4 weeks of where I would use the shield, my breasts would drain, my daughter would feed and the mastitis would go. I would try and wean the Shields as advised, and 3 days later mastitis would return. The reason for this was because my daughter had nothing to grip on to she would either be clamping down with a very shallow latch, causing the ducts to block, or she would consistently fall off and get tired, not draining the breast. It was hell, I was depressed, stressed, frustrated, my baby wasn't gaining weight, my nipples were bleeding and damaged, and worst of all I was not enjoying the newborn stage and slowly resenting my daughter every time she wanted to feed. Enough was enough, at her 4 week check she was a mere 26 grams (0.9oz) above her birthweight, I had had mastitis 5 times, and I finally made the decision to formula feed. I had attempted pumping to see if I could pump exclusively and my body just doesn't respond to pumps, I felt I had no choice and something had to give.
My daughter thrived on formula, she gained weight, I started to enjoy her. I went to my 6 week post partum check and was asked about BF. I explained what had happened and the Gp examined me and said "I'm not surprised you had challenges with your flat and inverted nipple". I was gobsmacked. I asked what that meant. He explained and showed me pictures and it all started to make sense. I was so upset and felt so let down by the professionally trained lactation consultants, He was also shocked it hadn't been mentioned to me. It was also here my daughters lip ties were found. Two separate issues that, had they been diagnosed, we might've had a successful breastfeeding journey.
My daughter is now 18 weeks old and I still have many regrets about the whole experience. After doing research I have found videos with techniques on how to BF with flat and inverted nipples, information that says continued use of nipple shields are sometimes needed in cases of flat/inverted nipples, and have looked into private lactation consultants who can specialise in this area. I would hate for anyone to go through what I went through, ASK for help, push for answers, check your nipples and ask the questions! I hope to try again with a second baby when the time comes, and I will be armed with the knowledge this time to hopefully succeed. It is POSSIBLE to breastfeed with flat and inverted nipples, however it is more challenging and you will need help and support. Good luck ladies, breastfeeding is the hardest thing I have ever done and we deserve all the support and help we can get!
Thanks,
Ruby (Rubixcube17)
SLEEP GUIDANCE & OUR JOURNEY
Our experience getting Ford to sleep through the night
Sleep is hard to come by these days. I miss those Friday nights that would end with, "Well, let's just see what time we wake up". While those types of weekends will be a thing of the past for at least a decade, there are things you can do to help set your household up for "success" which I know is always a messy word with kids. The first few months are usually filled with sleepless nights but let's also look at those first 2 years.
First, I am going to talk about how offering Ford sleep guidance went and then I'm going to talk about our sleep journey as parents.
I waited until 8 months to offer sleep guidance to Charlie. I hate the word training...sleep training. It sounds so cruel. Charlie slept in our room until he was seven months old and even though Ray wanted to start offering sleep guidance much earlier, I just couldn't do it. Charlie was on the thin side and I didn't think he could handle it. When we did it at 8 months old and it only took a few days and I immediately regretted waiting so long.
This time around has been very different. Ford is a much bigger baby and he feeds for comfort off and on throughout the night. I just went back to work and came to terms that I just can't be a human pacifier any longer. Our doctor said we could even start before four months but I felt most comfortable there. Yes, I am aware of the AAPs view on sleeping in the same room as the baby. According to the American Academy of Pediatrics (AAP), "The best place for a baby to sleep is in his parents' bedroom. He should sleep in his own crib or bassinet (or in a co-sleeper safely attached to the bed), but shouldn't be in his own room until he is at least 6 months, better 12 months."
If you move your baby out of your room earlier, like we are, I would just be extra cautious around having a safe sleeping environment. As a working mom of two under two with a baby that was only waking up in the middle of the night to breastfeed for comfort, I decided to move him at four months since I felt he would be worse off crying for milk in the middle of the night when he knew it was right beside him.
Our sleep training plan was very straight forward.
We agreed to move Ford into his own room but kept him in his bassinet and Dockatot since he was already very familiar with his sleep set up. I use a noisemaker, the lollipop baby monitor plus the v-tech sound monitor. I use the Oillie swaddle since he is so snug in it, I figured that paired with the Dockatot would offer womb like comfort. I also slept on a sofa near his room for the first 10 days because I felt guilty. I never let Ford fall asleep with a pacifier because I wanted him to learn to fall asleep without any sleep props. He also cries when he drops the paci and there's no way in hell I'm going to be running back and forth all night.
As I said, I did feel guilty. To get over that guilt I decided to start thinking about it differently. My baby has been waking up throughout the night greeted each time with warm milk that helped him drift right back to sleep. Instead of helping him learn how to put himself back to sleep and teaching him that it wasn't morning time, I was just too exhausted to deal with that and would "put a bandaid" on the entire situation by just whipping my boob out so I could get back to bed. Though of course this was the right thing to do for the first few months, it was now time to offer Ford some sleep guidance.
I would also like to point that as adults we wake up multiple times per night and roll over and go back to sleep. Instead of going back to sleep (this is what we want to teach our babies to do) they just cry. We think they must be hungry so we feed them. They just need help getting back to sleep. Unfortunately feeding them isn't the long term answer.
THE PLAN
We decided to let him wake up and cry for a few minutes before going in. I started with setting the time around 10 minutes, even though our doctor said it would be ok to go an hour. I quickly learned going in after such a short time made things worse. We quickly moved the 10 minutes to waiting 15 minutes (it was so hard) but that extra 5 minutes made a huge difference. Ford never even made it to 15 minutes but 12-13 minutes seemed to be his sweet spot.
We put Ford to bed at 7 pm with the hope we could get him to sleep every night from 7 p.m - 6 a.m.
The first few nights he was pissed. He woke up around 4 times a night but every night he would eventually put himself back to sleep after 10-12 minutes.
By night six I saw significant improvements. He dropped one of his wake ups. A few days later he dropped another. Listening to him cry was hard but as the days went on he slept longer and longer periods between wake ups and cried less and less.
By two weeks Ford was sleeping from 7 p.m - 6 a.m straight through the night. I check my Lollipop monitor app every morning and he might moan or let out one cry here and there but the only time he cries now is if he gets out of his swaddle.
It was a very long 2 weeks, but the key is not to give in and not to give up. The moment you give in and offer a feed you set back the progress. That being said it's ok if you can't handle it and do this. Nothing is perfect and you will have set backs. We went away last weekend and I think the change in environment threw Ford off so I offered him a feeding at 5 am when he woke up at 4:30 am crying. I immediately regretted it when he then woke up looking for that same feeding at the same time the next morning.
My takeaway for you is: Consistency is KEY
OUR SLEEP JOURNEY AS PARENTS
The moment Ray found our we were pregnant he vocalized his opinions around sleep and kids. He witnessed the benefits his sister experienced with a good sleep schedule and really thought setting up some sleep boundaries would do wonders for us and our children. I have to say that looking back on our sleep journey with Charlie it really has been a blessing.
Charlie goes to sleep every night at 7 pm and wakes up around 7am. He takes a nap at noon everyday and sleeps anywhere from 2-4 hours. He rarely fights us and sometimes even dives into bed. He sleeps in a sleeping bag swaddle and started taking a pacifier to bed around 8 months old. He has never been allowed to fall asleep in our bed, EVER. Like not even once. I'd be lying if I didn't say I would love to have him fall asleep in my arms a few times cuddled in bed but it's not even worth starting bad habits. Having a well rested child was tops on the list of our priorities when it came to raising kids. These work for our family and we've had great success. I believe most of it is due to consistency for which I have to thank my husband. At the same time we are in no way the type of parents that rush home on a Saturday just to get the kids in their cribs by noon for nap time. We try to also be flexible and realistic. That's why creating a sleep environment on the go is also very important to us for the times we can't make it home. My go to sleep tools for sleep on the go are the Hushh noise maker, HERE and our sleep shade, HERE.
I also would like to note that just because Ford is sleeping well now doesn't mean his sleep schedule will never change. There are sleep regressions that we still will most likely run into but for now I'm very pleased with this outcome.
BACK TO SCHOOL BOY PICKS
Back to school & little boys

Here are my little boy picks for back to school! They spend a ton of time outside at Charlie's new school so I included rain overalls. I didn't even know they existed, they are like snow pants but for the rain! I'm so happy I found them. I realized Charlie was pretty much out of clothing because I've been squeezing him into clothing from last summer. He will have a bunch of new options for his first year of school. I'm not that into busy character tops for kids but I find myself caving more and more because I know certain tops will make Charlie happy. He's not that into Disney characters yet but I included some fun options. Out of all of the busy or character tees we just got the one with the bus and one with tractors. H&M always has great Disney & Sesame Street options with out the $$$ price tags. All of the clothing below comes in baby - 4 years old. I'm a big fan of H&M for kids. They use organic cotton for some of their clothing and it seems to hold up better than some other popular baby brands I've tried.
We got Charlie's backpack from Monogram Mary. It's navy seersucker and is going to have a truck on it with his name. I wanted to give him something he would be so excited about on the morning of his first day. Knowing Charlie he will be talking about his truck backpack all day long. She also makes a very cute pink seersucker option. You can shop the bags, HERE. There is also a matching snack pack & lunch box. You can shop them, HERE & HERE. She also makes a great children's tote. This is a great extra bag to send your child to school with or to keep at their school for an extra pair of clothes and things like that. You can find the tote, HERE.
BACK TO SCHOOL PICKS FOR THE LITTLE GIRL IN YOUR LIFE
BACK TO SCHOOL & GIRL PICKS

How cute is my niece?? I love shopping for little girls clothing. Everything is so adorable. If I had a little girl her style would definitely have some edge. My go to for most kids clothings is H&M. Surprisingly they do use nice material for many of their kids clothing, many items being made with organic cotton. I also have had good experience with H&M clothing lasting through multiple washes. Ford wears so much of Charlie's old clothing which is mostly H&M and it's still in great shape. I usually size up when buying kids clothing because I would like it to last as long as possible. Check out my top back to school picks below! These sizes range from baby - 4 years old.
We got Charlie's backpack from Monogram Mary. It's navy seersucker and is going to have a truck on it with his name. I wanted to give him something he would be so excited about on the morning of his first day. Knowing Charlie he will be talking about his truck backpack all day long. She also makes a very cute pink seersucker option. You can shop the bags, HERE. There is also a matching snack pack & lunch box. You can shop them, HERE & HERE. She also makes a great children's tote. This is a great extra bag to send your child to school with or to keep at their school for an extra pair of clothes and things like that. You can find the tote, HERE.


The Lollipop Baby Monitor


Mrs. Nipple's Review of the Lollipop baby monitor
I was so excited to try out the Lollipop monitor. I've had my eye on it for months. I am always drawn to innovative products and at first sight you know this camera is going to be different.
I registered for the Nest when was pregnant with Charlie. Though I still think it's a great product I was not willing to pay the steep subscription fee allowing you to see the recorded footage of your child. I loved using the nest as a nanny cam and would always check on Charlie and our nanny when I went back to work. For that purpose, the Nest is wonderful. Now that I have the Lollipop camera as a baby cam I would choose the lollipop over the Nest every single time and I’ll tell you why.
When we had Ford I started thinking of which camera would work the best with our lifestyle and needs. Somethings that were important to me were getting a good view of him on any of his many contraptions. Now that we live in a home, a much bigger space, being able to see him in different areas of our home was important to me. Being able to place the camera pretty much anywhere is a really great feature.
Another great feature is how clear the picture is. I can get such a clear view of Ford that I can actually see him breathing and making little movements which is very important to me.
I also wanted a camera that could offer us smart data. I didn't want to scroll through a whole nights worth of footage to see if Ford woke up. I wanted to be able to glance at a summary of how the night went. I love how the lollipop monitor has crying detection and then captures the clip of the footage when he was up and saves it for you.
SOME OTHER THINGS I LOVE
Option to keep the Wifi connection private- This is a big topic. It's scary knowing others can get access to your baby’s live video. This is an important feature as It significantly reduces the risk of hacking. Outgoing video streaming will be blocked in that configuration.
MOBILE APP FEATURES:
Easy to use
Intuitive navigation when using multiple cameras
Audio and video quality is excellent
CAMERA FEATURES:
Infared night vision - Such a clear picture even at night
VOX - The Voice Activated Alert (VOX) feature allows you to conserve power on the video monitor. For example, you may want your video monitor to shut off when your babyis sleeping, and turn on when your baby cries. Adjusting the VOX sensitivity levels determines how sensitive the camera is to your baby's cry.
Multiple cameras- especially important with multiple kids
Two-way talk
Noisemaker & lullibies- LOVE this feature. Especially for traveling. There are so many different options from blow dryers to Mozart. If Ford wakes up from a nap early I put one of the options on and he drifts back to sleep.
video recording & snapshot
zoom
You can view camera from outside of the home
You can send access to other people
128 degree view
720p HD- I don't even know what this means but it is SO clear
Audio only mode - If you don't want to keep your phone on the whole night you can do the audio only version. Your phone screen will be turned off, but you’ll still receive the audio feed from your baby’s bedroom and you can easily turn on the video stream if needed. It basically acts as a baby crying detector in that mode.
Very well priced- $134
The only two things I will point out.
1- I had to lower the sensitivity level of the background noise because I was getting way too many alerts. Once I did this it fixed the problem
2-I'm kind of over using my phone as a monitor when I'm home but I love the flexibility it offers when we are out and when we are traveling. I also can’t see myself walking around the house with a baby monitor. I've come up with the perfect system for our lifestyle.
I use the lollipop monitor paired with an "old school" V-tech audio only baby monitor. The audio only monitor was very cheap and came with two bases. I leave one in the kitchen and one next to my bed. When I go to bed I put on the V-tech audio monitor and use that throughout the night. If Ford wakes up, I can hear him through the V-tech monitor and can look right on the lollipop monitor app to see what’s going on. When I wake up in the morning the first thing I do is check my lollipop monitor app. My favorite feature is that it shows me how many times Ford woke up and I can review the clips. Before I had this monitor I could never remember how many times I got up in the middle of the night to feed Ford because of the exhaustion I was experiencing. I wish I had this monitor because I know I was overfeeding him. This is by far my favorite feature. I am even considering purchasing another one for Charlie’s room.
You can purchase the Lollipop baby monitor, HERE.
You can purchase the V-tech audio only monitory I use paired with the Lollipop, HERE.


DAYTIME VIEW

NIGHT VISION

AUDIO ONLY MODE

MY FAVORITE V IEW
Pacifier Weaning
mrs.nipple & weaning

Pacifiers are such great tools for the beginning of a child's life. They offer so much comfort and help free up some time for us mamas! They also reduce the risk of SIDS, satisfy the sucking reflux, and help them self soothe. When your baby hits age 2, it's time to start thinking about weaning. This is because all of the negatives start outweighing the positives between age 2-4. Though it is a wide range I have decided to stay on the safe side and wean early.
“Before age 2, any problems with growing teeth usually self-correct within 6 months of stopping pacifier use,” says Evelina Weidman Sterling, PhD, MPH, co-author of Your Child's Teeth: A Complete Guide for Parents.
After the 2-year mark, problems can start. Your baby's top or bottom front teeth may slant or tilt, Sterling says. And the problem can worsen as time goes on.
“Pacifier use after age 4, which is when permanent teeth start to come in, can have major long-lasting effects on adult teeth,” she says.
Charlie is 22 months old. He uses his pacifier during naps, at night, and for car rides. He also uses it here and there throughout the day for comfort. I did not want to do anything "cold turkey" since he has such an attachment to his pacifier and I wanted him to be very much involved in the weaning process. He also has been caught removing his 4 month old baby brother’s pacifier and putting it in his mouth. This is another reason he really needs to be part of the process. Charlie and Ford use the same type of pacifier. I really love the Natursutten pacifiers and I'm just not willing to give his brother any other brand for long term use.
We just started the weaning process and my goal is to remove it from his routine completely by mid October. I am doing it in stages.
Stage 1: Focus on Charlie taking his pacifier out of his mouth and leaving it in his crib without removing it myself. I think I’ll give him up to 20 minutes before I would eventually intervene. My goal would be for Charlie never to use his pacifier when we are in the house or out & about unless we are in the car.
Stage 2: Once he starts taking the pacifier out of his mouth on his own when he wakes up before we go downstairs and leaves it in his crib without me asking for at least 7 days in a row, I will then stop the pacifier use in the car. For the first week I plan on giving him a new little toy or something to distract him in the car and hopefully he will not miss it. During this time I will also stop using it for naps. I am going to introduce a new stuffed animal and book during this time.
Stage 3: After napping successfully without his pacifier for seven days I am then going to remove his pacifier during nighttime sleep. I again will introduce a new stuffed animal and book.
Stealing pacifiers: If and when Charlie takes his brother’s pacifier out of his mouth and puts it in his own, I am going to use those as teaching moments stressing the fact that he is now a big boy and big boys don't use pacifiers. I will also remind him pacifiers are for babies and Ford is a baby. If this doesn't work (I have a feeling it's not going to be a perfect transition) I will use the 123 Magic/timeout theory where he may spend a few minutes in timeout if he doesn’t obey after 3 tries.
This is my own plan and I have not tried this in full yet. I will share our progress on instagram so please follow along if you are interested. Stay tuned! Wish us luck.
If you want a three day plan read below:
Your child can be binky-free in just three days, says Mark L. Brenner, author of Pacifiers, Blankets, Bottles & Thumbs: What Every Parent Should Know About Stopping and Starting (Fireside). Here's how to do it.
Day 1: In the morning and at bedtime, tell your child that you can see she wants to do lots of things that make her older. Tell her that's a good idea, and that in three days it will be time for her to say goodbye to her pacifiers. Tell her you know she can do it and that you'll work together on it. Keep the talk to 30 seconds and don't sound as if you're asking permission. If your child responds, reflect back her feelings—"I know you don't want to"—then move on. Don't worry that your child will become anxious if given advance warning. "That's a myth," says Brenner. "Like adults, children like to prepare themselves physically, psychologically, and emotionally for change."
Day 2: Repeat the same 30-second talk twice daily, only replace "in three days" with "tomorrow." Don't try to sell her on the idea. Keep your tone and manner matter-of-fact.
Day 3: Remind your child that it's day three and time to gather up his pacifiers. Act as if you're going on a scavenger hunt and ask your child if he'd like to help. Even if he refuses and protests, proceed to collect his pacifiers, place them in a plastic bag, and put them on the front step for "pick-up by the recycling truck." Explain that the pacifiers will be made into new tires or toys. "Children recognize that recycling is purposeful and intelligent, and will be far less upset than if you throw their treasured pacifiers in the trash," says Brenner. Which is not to say your toddler won't have a meltdown. Be empathetic, but firm, Brenner says, adding that most children get over losing their pacifiers within 48 hours.
Willow Pump Review....Too good to be true?
Mrs. Nipple's honest review of the Willow Pump

Too good to be true?
I'm writing this blog post while pumping in a coffee shop. Yup, you heard me correctly. I'm writing this blog post while pumping in a coffee shop. From the moment I announced I was trying out the Willow Pump, the DMs came streaming in. So many mamas out there were just as intrigued with this new pump, which seems to be first in class in the hands free "discrete" category. I received so many questions about the Willow Pump. Is it really actually quiet? Will I be able to attend a business meeting while wearing it? Can I get things done around the house while pumping? The number one question being, is it worth the money? It's like that unicorn...you've heard of it but you've never actually seen it...so does it actually exist?
First I'll start with the set up...
This pump is simple to put together. It's just a few pieces, a quick charge, downloading the Willow app and you are ready! I also recommend watching the educational videos so you know exactly what you are doing. Then like anything else it takes a little practice.
Learning curve
Willow advises that you pump at least 7 times within the first 7 days. That's because with Willow, it does take a little time to master it. It is not your average pump. Willow offers the option of a coaching call to help you during those first few days. I highly recommend jumping on this call. I think those that like the Willow don't mind putting in the extra effort upfront to then get the benefits of using the Willow vs. your traditional pump. A few things to focus on during this time is mastering placement of the pump on your breast, emptying the remainder of the milk from the pump into the bag, and changing bags mid-pump. I picked these because these were the three areas that took a little time mastering for me personally. You really have to get your nipple lined up correctly. With this pump, you can not see where your nipple sits while pumping like you can with the traditional pumps. The bags are also different than your traditional bags. You have to get a good seal (with proper alignment!) to prevent air from filling the bags and you also need to turn the pump a particular way to prevent leakage of your liquid gold after you pump. The customer service was great and having a coach to walk you through these areas was super helpful. It still takes practice to get these new skills down, but the benefits of the pump can be worth it to some.

Parts and way less of them
One of the things I hate most about another pump I’ve used and most traditional pumps is the amount of parts: the bottle, the flange, the plastic piece that goes on the outside of the back of the flange and the rubber piece that goes on the inside.....times two. Pumping on the go is not easy for a number of reasons and one reason is this...so many parts! Willow clearly has the traditional pumps beat here. There are 3 pieces plus the bag, but when you're done pumping you just take the bag right out, it's presealed. There is no question that it is easier to travel with the Willow vs a traditional pump. You only have to wash 2 parts and they are dishwasher safe.
Time
I did find I was pumping for longer periods of time with the Willow pump vs. the traditional pump. I think this was due to the fact that the Willow bags only hold 4 oz of milk each. For some this is fine but I like to pump as much as my body will allow when I'm pumping which is over 4 oz. The Willow app alerts you that you reached 4 oz of milk and you have to take the bag out and insert a new bag. I get into a grove while pumping so this kind of messed with that grove a bit. I eventually ended up deciding to stop at 4 oz unless my breasts were engorged.
Is it really silent?
The Willow Pump is definitely quiet but it does make sounds. It makes the most noise in the beginning while it is in the stimulation phase, before switching to expression, but even during that time it is so much quieter than your average pump. Would you be able to hear it in the quiet section of the library? YES! But not in a coffee shop.

How discrete is it?
Can you pump while holding your baby, cleaning the house, folding laundry, sitting in the corner of a coffee shop or driving? YES!! Are you going to pump with the Willow while you are walking around town? I doubt it. I wear a 34 B and it look like I have DDD or even bigger....I can't remember what comes after DDD like maybe X or something like that?! Well, then my boobs are XX while wearing the Willow. There's no way you will catch me walking around town looking like this, but it sure does help while driving or cooking dinner. I actually wore them while eating dinner with my parents and it was so nice not having to spend an extra 30 minutes I didn't have to pump with the door closed. It also feels nicer. I often feel like I'm pumping myself as if I am a cow when I use a traditional pump. These slip right into my bra and that's it!

Cost
There's no question that the Willow is expensive. On top of the price of the pump, the bags will also cost you a pretty penny. That being said I know many mamas will spend the money on a pump that could really fit into their lifestyle. Willow now offers financing, with payments starting at $43/month. You can also use your FSA/HSA funds as well.
Would I recommend the Willow?
I think it really comes down to what your needs are and how motivated you are to learn to really use the Willow correctly. If you occasionally pump and you can usually find time to sit down in a discreet place while pumping, then this may not be for you. If you are always on the go, have multiple children, can't find a second during the day or constantly traveling and can't always find a discreet area to pump, then the Willow is a wonderful option. It's not perfect. I'm going to say it again, it's not perfect which you will usually find with something so innovative, but because I spend 60 percent of my time in my car because of my job, it's an easy choice that the Willow works with my lifestyle. That being said, if I'm home on a Thursday night and the kids are asleep, I will reach for my traditional pump because it pumps the milk in less time and can hold greater than 4 oz of milk.
To learn more you can find a link to the Willow Pump website, HERE.
If you have any specific question please ask them on instagram under comments or send me a DM.