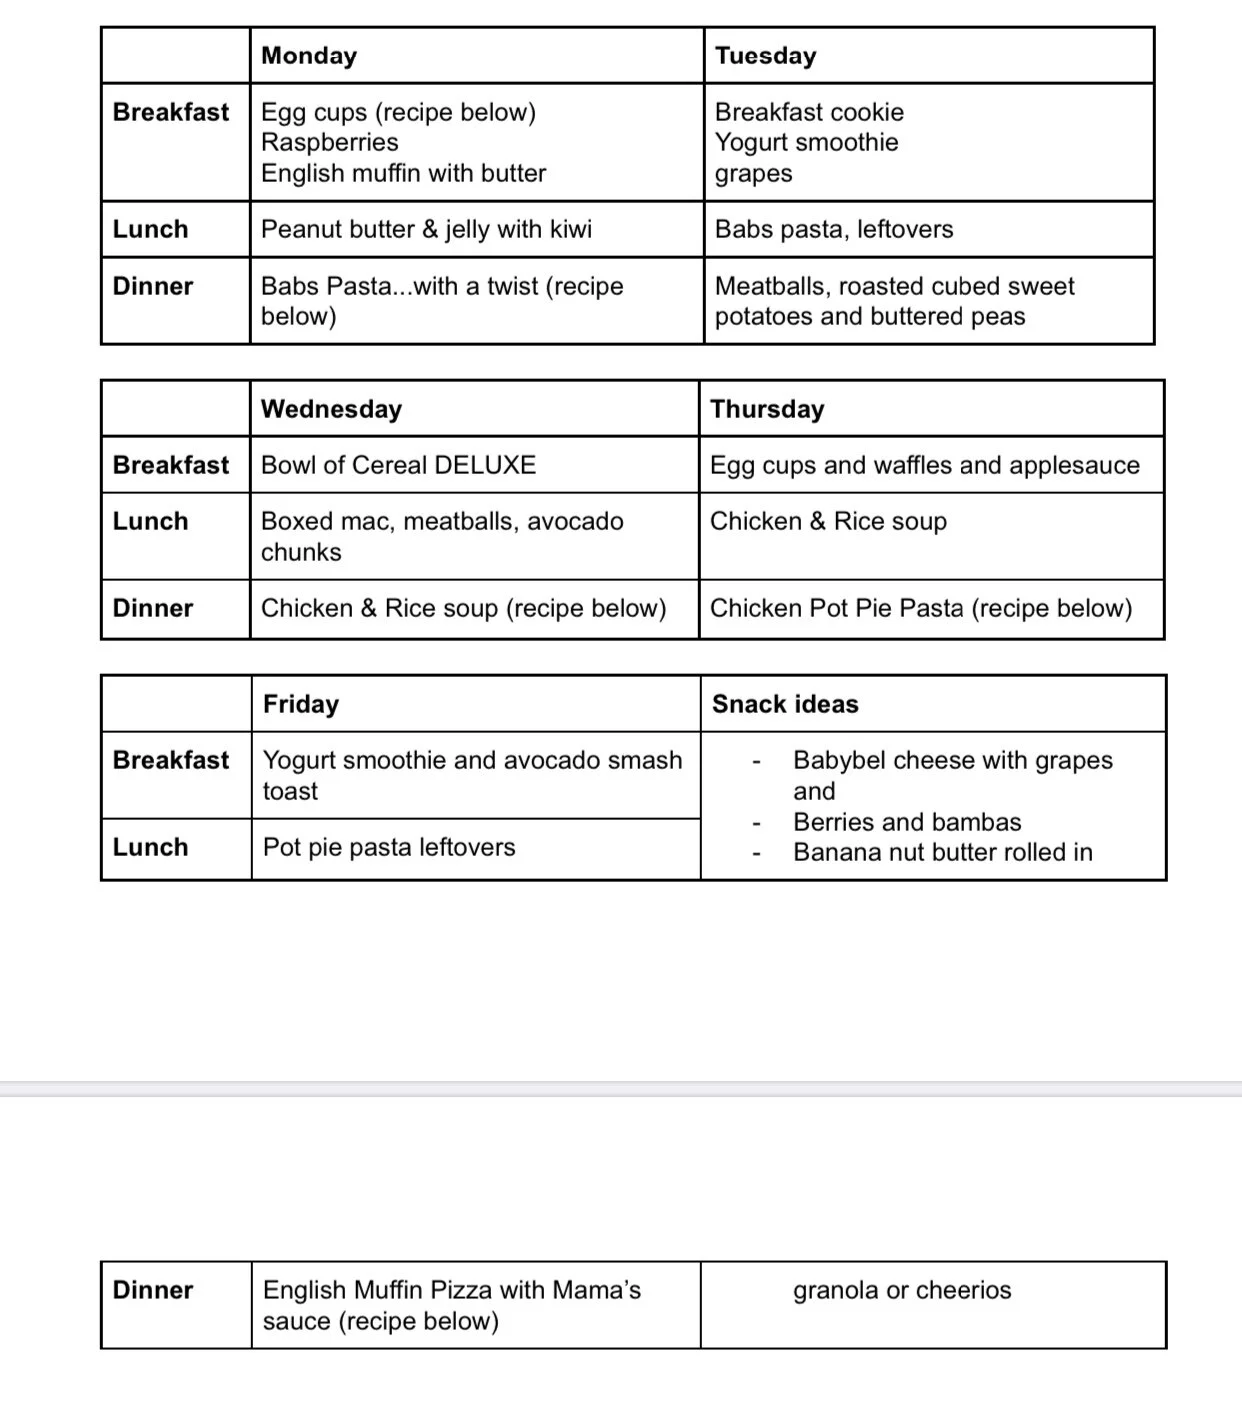
MEAL IDEAS FOR YOUR LITTLES


what to cook


WEEKLY MEAL PLAN

Highlighting @emilykasel for tips on meal planning! Over the past 2 ½ years of motherhood, I have learned that my kids eat...a lot, like multiple times a day. It’s really important to me to sit and eat with my kids, and to have them eat home cooked meals. However, it is also quite important for me to remain semi-sane. These are some themes that come up for me when it comes to cooking for my kids without losing my mind - make ahead, freezes well, doctored up, leftovers. Check the recipes below, it is nothing earth shattering but my hope is it will help make meal planning a little easier for you...even if just for one week.

*With the current situation really shaking up routines there are many great options for meals that are quick and easy and meals you can prepare ahead of time.

IMG_5816.jpg
IMG_5817.jpg


KITCHEN ESSENTIALS

There are certain items I keep in the fridge or pantry at all times. Most of these items can be found at local grocery stores, online through Fresh Direct or Thrive Market. Here they are! Scroll right to see all my faves. They are also all listed in the grocery list above.


Jovial GF pasta

Banza boxed mac and cheese

Goya organic white beans

Earth's Best organic frozen beef meatballs 

Vital Farms eggs and butter

Kerrygold butter

Ronnybrook yogurt smoothies

Maple Hill Creamery grass fed milk

Dave’s Killer bread and english muffins

Crofter’s Just Fruit Spread

Better Than Bouillon Organic chicken broth base

Trader Joe’s Bamba peanut snacks

Bare brand apple chips

Little Duck Organics snacks (gummy fruit snacks made of real organic pureed fruit!)


RECIPES TO GET YOU THROUGH THE WEEK


Eggs Cups - MAKE AHEAD

Ingredients:

  • 6 pasture raised eggs

  • ¼ cup milk

  • ¼ cup grated cheddar

  • Salt and pepper to taste

  • 2 large handfuls of spinach or any veggie your kid is into, chopped


Directions

  • Preheat oven to 350. Spray mini muffin pan with cooking spray or grease with butter.

  • Whisk together eggs, milk, salt, and pepper. Mix in chopped veggies.

  • Pour egg mixture into prepared pan, filling cups about 2/3 full, sprinkle cheese among the cups.

  • Bake for approximately 8-10 minutes, or until eggs set. Allow to cool in the pan for 10 minutes before moving to the wire rack. Egg cups can be stored in an airtight container for 4 days or frozen for up to 3 months.


Breakfast Cookies - MAKE AHEAD

Recipe inspired by the amazing Laura Fuentes of MOMables

Ingredients:

  • ½ cup mashed banana (about 1 large)

  • ½ cup natural nut butter 

  • ½ cup honey or maple syrup

  • 2 teaspoons vanilla

  • 1 cup rolled oats

  • ¼ cup flour of your choice (almond flour to make GF)

  • ¼ cup ground flax seed (or an additional 1/4 cup flour)

  • 2 T your milk of choice (oat, cow’s milk, or whatever really) 

  • ½ teaspoon baking soda

  • ½ cup dried cherries or raisins


Directions

  • Preheat the oven to 350°F. Place parchment or spray cooking spray on two cookie sheets with cooking spray, and set aside.

  • In a large bowl, stir together the wet ingredients.In a small bowl, combine the dry ingredients. Combine wet and dry mixtures together. If the mixture seems too dry, add a little more milk

  • Scoop ¼ cup dough mounds and drop 3 inches apart. Use a spatula dipped in water to flatten, and spread each cookie to about ½ inch thick.

  • Bake for 15 minutes or until browned. Cool completely on wire cooling rack before storing in an airtight container. 

  • Will keep for 3 days, or freeze for 2 months.


Cereal Bowl DELUXE - this is my take on the old classic, with a punch of protein to keep your little one energetic all morning...or until snack time.

Ingredients:

  • Cheerios or cereal of your choice (no added sugar)

  • Purely elizabeth granola

  • Nut butter

  • Berries and sliced banana or any seasonal fruit

  • Milk, whatever is prefered

Directions:

Fill the bowl with cheerios, a few tablespoons of granola, top with fruit, milk and drizzled nut butter. Enjoy!


Oven Roasted Chicken Breast - MAKE AHEAD and use all week!

Ingredients:

  • Skin on, bone in chicken breasts

  • Olive oil

  • Dried herbs

  • Salt and pepper

Directions:

  • Preheat oven to 375. Rub chicken breast all over with olive oil, sprinkle with dried herbs and generously salt and pepper.

  • Bake until chicken is no longer pink at the bone and the juices run clear, 45 to 60 minutes. An instant-read thermometer inserted in the thickest part of the breast meat should read 165 degrees

  • * Make Wednesday evening or Thursday, should only be used for 2-3 days once cooked.


Babs Pasta...with a twist - this Mrs. Nipple community famous dish is a fave in our house, and recently I added 1 ingredient to bump up the protein, fiber and creaminess!

Ingredients:

  • 1 lb pasta

  • Grass fed butter or olive oil

  • 3 fat cloves garlic, chopped

  • 3-4 cups chopped broccoli

  • 1 can of white beans, drained and rinsed

  • 1 lemon

  • Grated cheese (optional)

  • Salt and pepper

Directions:

  • Boil and salt a large pot of water

  • Boil the broccoli and pasta for however long the box directs. Before straining, scoop a cup of pasta water out.

  • In the same pot, saute garlic with some grass fed butter or olive oil until fragrant but not browning yet. Toss in the white beans and mash them up with a potato masher or back of a fork. Once creamy, mix in ½ cup of pasta water then remove from heat.

  • Add everything into the pot - pasta, broccoli, lemon juice & zest, more pasta water, grated cheese and mix vigorously!


Chicken Pot Pie Pasta - this delish pasta satisfies our whole family, my friend shared it with me. It is adapted from the Defined Dish cookbook!

Ingredients:

  • EVOO and/or butter

  • 3 cups mirepoix 

  • 1 lb pasta (we love using bowties/farfalle)

  • 2 cups chicken broth

  • 2 cups milk

  • 1 t dried or fresh thyme

  • 1 ½ t dried mustard powder

  • 1 t paprika

  • 1 t garlic powder

  • 1 cup frozen peas

  • 2 cups diced cooked chicken breast

  • 1 tablespoon lemon juice

  • Salt

  • Pepper


Directions:

  • In a heavy bottomed pot, heat 2 T oil or butter and saute mirepoix + salt and pepper until tender, about 6 minutes.

  • Add in pasta, broth, milk, thyme, paprika, garlic powder and stir to combine. Bring to a boil. Reduce heat to simmer and cook, stir occasionally, until pasta is cooked through and tender. 

  • Stir in frozen peas, cooked chicken, lemon juice, remove from heat and cover. Let stand about 5 minutes until heated through.


Chicken and Farro Soup - we love soup in our house, while you may think it’s a mess, hear me out. You can strain all or as much broth as you like. My toddler loves the broth and can handle a spoon well. My 1 year old gets the goodies from the soup strained and onto his tray. Either way, it’s a meal we all love and is made in one pot - a total win!

Ingredients:

  • 4 fat cloves of garlic

  • 2-3 cups of mirepoix (carrots, celery & onion)

  • 4-6 cups of chicken broth (made using water and bouillon base)

  • 3-4 cups of spinach

  • 1 cup farro 

  • 2 cups chopped chicken breast

Directions:

  • Saute garlic and mirepoix ( carrots, celery & onion) until tender

  • Add broth, mix in the farro and bring to a boil

  • Simmer for about an hour or until the farro is tender.

  • Mix in chicken and spinach, simmer until spinach is wilted.

  • Serve with grated cheese.


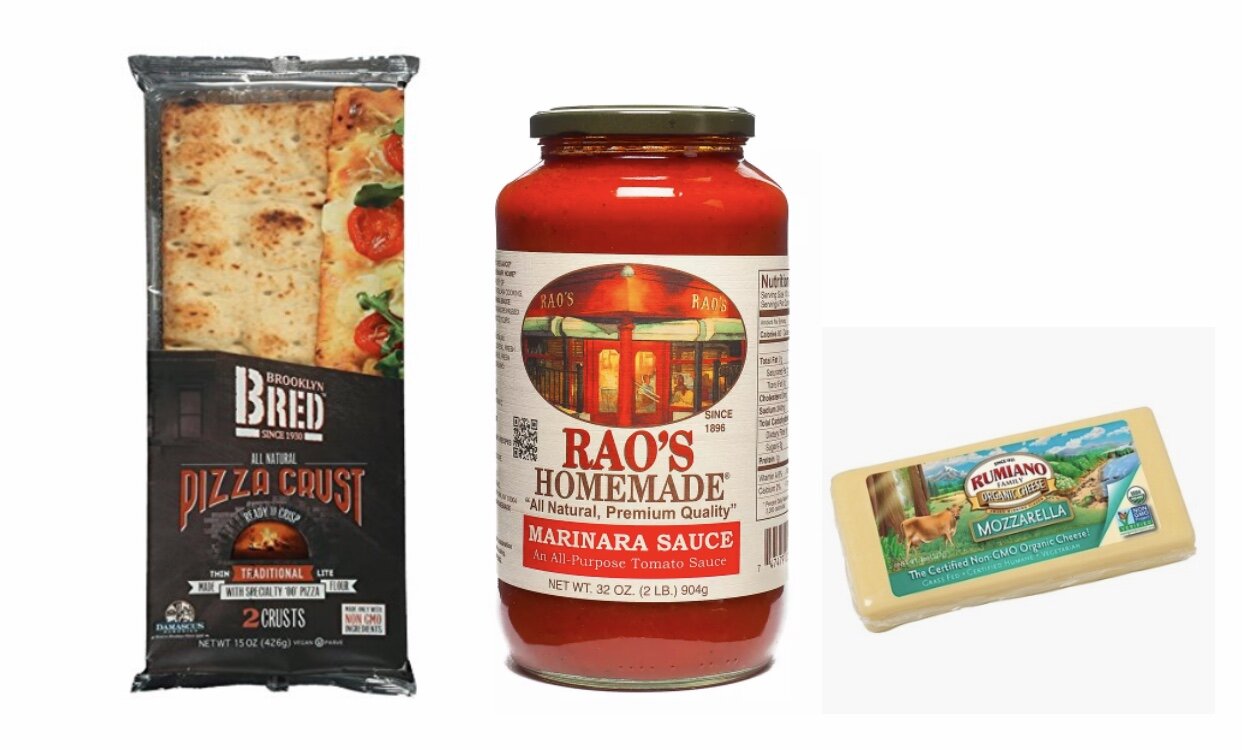
Mama’s Pizza Sauce -  this couldn't be easier and while I am not one for sneaking “healthy food” by my kids, this is a super easy way to throw dinner together in minutes without sacrificing a balanced meal. And let’s face it you’ve fed these kids all week and you’re just kind of over it. White beans are a total game changer. You are adding fiber and protein to a meal in the time it takes to open a can of beans. Just try it!


Mix the following in your high speed blender until creamy and smooth.

  • 1 bottle of Rao’s marinara sauce

  • 2 handfuls of spinach, try a little and always can add more

  • 1 can of white beans, drained and rinsed.

Keep this in the fridge for over the weekend. Use this to make pizzas on english muffins and fresh mozzarella.


What's for breakfast, lunch....Oh and dinner?!


What do I feed these kids!


If you’re like me being creative at mealtime can be quite the struggle, especially with a picky eater that refuses to eat his oatmeal if the peanut butter is on the bottom of the bowl vs the top (preference changes daily) + yes he loves peanut butter in his oatmeal!

I decided to look to our Team Nipple foodie expert, Kelly Goughary, to get her take on what to feed these littles when feeding time gets a little redundant. Each week for the next few weeks I’ll be sharing her weekly recipes.


Weekly Meal Plan 1


Monday  

Breakfast: Banana almond muffin 

Lunch:  Leftover pizza 

Snack: Flaxseed bread with sunflower seed butter  

Dinner: ½ mild Italian sausage, cauliflower gnocchi, tomatoes, and corn 


Tuesday

Breakfast: Banana almond muffin

Snack:  Spinach, blueberry, and chia smoothie 

Lunch:  Leftover pizza 

Snack: Serenity Kids roots pouch

Dinner: Cheese quesadilla with mashed avocado, tomatoes, and sweet potato 


Wednesday

Breakfast:  No-mess oatmeal bake 

Snack:  Banana & Organic O’s  

Lunch: Rotisserie chicken with chickpea pasta 

Dinner: Rotisserie chicken, hummus, tomatoes, peas, and remaining chickpea pasta


Thursday

Breakfast: No-mess oatmeal bake

Snack: Spinach, blueberry, chia seed, and peanut butter smoothie

Lunch: Pasta & BBQ chicken 

Snack: Pirates Booty, leftover smoothie

Dinner: Only ate flaxseed bread (offered ground beef with sauce, cubed sweet potatoes, mozzarella cheese, and broccoli)


Friday

Breakfast:  No-mess oatmeal bake and banana

Lunch: Cheese quesadilla and ground beef, 

Snack: Broccoli florets, Serenity Kids veggie pouch

Dinner: Pasta with sauce, roast beef, and broccoli 


Saturday

Breakfast:  Banana almond meal muffin and prunes

Lunch: Roast beef, peas, and tomatoes 

Snack: Okra and cheddar cheese  

Dinner:  Sauteed grass-fed ground beef, corn, and black beans


Sunday

Breakfast:  No-mess oatmeal bake and Forager cashew milk yogurt 

Lunch: Cauliflower gnocchi, ground beef, and corn

Snack: Rice cake and Serenity Kids chicken pouch

Dinner: Ground beef, black beans, corn, and cheese quesadilla 


recipes


Banana almond flax muffins

These muffins are a low sugar, quick and easy, breakfast/snack option that both you and your little one can enjoy!

Ingredients

3 eggs

1 tsp vanilla extract 

2 ripe bananas, mashed

1/4c coconut oil, melted but cooled 

2c almond flour

1/4c flaxseed meal

½ tsp baking soda

1 tsp baking powder

1 tbsp cinnamon

Directions

Preheat oven to 350 degrees F

In separate bowls, mix wet and dry ingredients

Incorporate dry ingredients into the wet mixture

Let sit for 5 mins allowing the flaxseed meal to fully absorb the wet mixture

Portion into silicon lined muffin cups

Bake at 350 degrees for 18-20 minutes 

IMG_1954 2.jpg

Pizza

Faster and healthier than takeout, pizza night is now even easier!  

Ingredients

Pizza crust

Tomato sauce

Cheese

Extra toppings

Directions

Preheat oven to 425 degrees F

Lightly brush crust with olive oil

Top with marinara sauce, cheese, and any other favorites 

Bake pizza on a sheet pan until cheese is melted and crust is golden brown (roughly 10-12mins)


Flaxseed bread

A savory bread, versatile bread that can be enjoyed with butter, cream cheese, nut butters, hummus, or even jam.  This bread is packed full of healthy fats, fiber, and protein to keep 

Ingredients

5 eggs

2c flaxseed meal

1 tsp baking powder

½ tsp baking soda

¼ tsp pink salt

½ c water

¼ c olive oil

1 tsp apple cider vinegar


Directions
Preheat oven to 350 degrees

Coat bread pan with a little olive oil

Mix together dry ingredients

In a separate bowl, whisk eggs, oil, and water

Incorporate dry ingredients into wet

Let sit for about 5 mins before pouring into the bread pan

Bake in a 350 degree oven for 40mins

Let cool 

Stores well in the fridge for up to 1 week

IMG_1956 2.jpg

TJ’S Cauliflower gnocchi

Very versatile dish,  can be roasted alongside any protein and/or vegetable you like.  This hand’s off method gets the gnocchi nice and crispy on the outside, while staying soft in the middle. Never ever ever follow the instructions on the packaging! 

Directions

Preheat oven to 425

Line a sheet pan with parchment paper

Spread frozen gnocchi evenly 

Bake for 30mins, or until golden brown, flip halfway through

IMG_1957 2.jpg

Spinach blueberry chia smoothie

A “PB&J” in a cup!

Ingredients

1c unsweetened almond milk 

2 handfuls fresh spinach or roughly 1c frozen chopped spinach

1 tsp chia seeds or 1 tbsp flaxseed meal (just looking to add fiber)

Handful of organic blueberries

1 tbsp sunflower seed butter

Directions

Blend all ingredients in a blender & serve 

IMG_1958 2.jpg


No-mess oatmeal bake

Oatmeal and toddlers are like oil and water, they simply do not mix.  Unless, of course you bake the oatmeal and serve it in bar form!  This was truly a life altering moment for me. 

Ingredients

2c oatmeal

1c almond flour

2 mashed bananas

¼ c coconut oil, melted and cooled

1 tbsp vanilla extract

½ tsp baking soda

1 tsp baking powder

2 tsp cinnamon

Splash of milk (your choice)

Handful of raisins (can omit)

Directions

Preheat oven to 350 degrees F

Mix ingredients thoroughly then bake in a coconut oil greased pan (9x9) for 28-30 minutes  

Cut and serve once cooled 

IMG_1959 2.jpg

Spinach almond muffins

Ingredients

3 eggs

1 cup cooked & pureed spinach

1 tsp vanilla extract 

1 ripe banana, mashed 

1/4c coconut oil, melted but cooled 

2c almond flour

2 tbsp coconut flour 

1/4c flaxseed meal

½ tsp baking soda

1 tsp baking powder

1 tbsp cinnamon

Directions

Preheat oven to 350 degrees F

In separate bowls, mix wet and dry ingredients

Incorporate dry ingredients into the wet mixture

Let sit for 5 mins allowing the flaxseed meal to fully absorb the wet mixture

Portion into silicon lined muffin cups

Bake at 350 degrees for 20-25 minutes, depending on your oven  

Popeye Pancakes 

Makes 10 silver dollar pancakes 

Ingredients

2 eggs

1 tbsp coconut flour

2 tbsp flaxseed meal

Splash of unsweetened almond milk

3 tbsp pureed spinach

Dash of cinnamon

½ tsp vanilla extract 

Directions

Melt unsalted butter in a pan over medium heat

Beat eggs in a bowl

Add all ingredients and mix thoroughly

Spoon a small amount of batter into the heated pan

Cook until edges are crispy, and then flip

Serve and enjoy!

Pancakes do not need to be served with syrup; my little guy loves his with sunflower or nut butter 

kitchen essentials

There are certain items I keep in the fridge or pantry at all times.  My toddler goes from happy to hungry in seconds and I’ve found that having certain foods readily available make both our lives better. Here they are! Scroll right to see all my faves.

IMG_1965 2.jpg


BABY LED WEANING


BABY LED WEANING BY MADA LEIGH LAVEY, WWW.MADALEIGHBLOG.COM


Introducing your LO (or “little one”- a hand abbreviation I used often) to solid foods can be both an exciting and super nerve-wracking time. I did lots of research and found that the combination of baby-led weaning and baby-led purees would be best for our family. Sound like I’m speaking Chinese? Don’t worry – I get into the nitty-gritty later in the post + why I chose these particular methods for Temple.

I know baby-led weaning can seem intimidating and even scary. BUT, once you do your research, I think you’ll find it both simple and safe, not to mention beyond beneficial for Baby’s development. Temple is LOVING it and we’re only one month in. It’s crazy how quickly they catch on, chewing and grabbing their food all on their own.

I want to remind you that I am no expert, just a mom who did her homework and created a plan that works for us! Every child is SO different and ultimately you need to do whatever you feel comfortable with. If you start BLW (baby-led weaning) and find you’re constantly stressed about choking, then maybe this method isn’t for you. Your baby can pick up on that stress, so just go with your mommy gut, do your research, and find what works best for your LO!

Okay, let’s dive in! - Mada Leigh


WHEN TO START FEEDING BABY?

Baby should be fed exclusively breast milk or formula until at least 6-months. Breastmilk/formula has more calories than any vegetable, fruit or grain – so that’s what’s best for your LO in the beginning. Once they hit the 6-month mark, their digestive system is matured and ready for solid foods. You can read more on why this is the best age to consider solid foods in this article.

Even once 6 months have passed and your baby is technically ready to start trying real food, it’s important to check for the Signs of Readiness

  1. Baby is at least 6 months old. 

  2. Baby should be able to sit up unassisted.

  3. Baby is starting to develop their pincer grasp, or the method they use to pick up food – or other objects – with their fingers. Practice makes perfect, so they will get better as they continue their food journey! Most 6-month-olds cannot pick up a small piece of food. That’s why it’s best to start with strips or fry-shaped foods first (more on that below).

  4. Baby is eager to participate. Does your baby grab at your food, or seem interested when you eat? If so, then your LO could be ready to start eating! So what are all the things to show they are ready for food?

I’m often asked, why no cereal before solids? After reading articles and talking with my pediatrician, I’ve determined the whole “rice cereal makes your baby fuller + a better sleeper” theory is a complete myth.  Introducing rice cereal before real food goes against the baby-led weaning method, so it’s just not for us! With BLW, you go straight to food- no traditional “baby food” necessary. Your LO’s main source of nutrition is breastmilk/formula for the first year anyway, so at this stage food is all about having fun, growing sensory development, and exploring textures and flavors!

Some people also believe you shouldn’t introduce fruits in the beginning, because once Baby tastes the sweetness, they’ll be the only things they want. Personally, I disagree. Vegetables are obviously super important, but I gave Temple a banana during her very first week of eating real food! In our experience, this has not affected how well she eats veggies. Making sure your LO is trying a wide variety of foods is most important!


SO WHAT EXACTLY IS BABY-LED WEANING?!

“Baby-Led Weaning” is a term that refers to skipping the spoon-fed puree phase and going straight into solids. The method involves offering age-appropriate foods softly cooked and cut into pieces Baby can pick up on their own.

With BLW, you actively encourage self-feeding. We never put food into Temple’s mouth, even when we let her feed herself purees. There is no spoon feeding, and babies mainly gnaw on things to start. They need to learn about their gag reflex so they know how to eat regular food when they’re bigger. Even if you take the more traditional route and start with pureed baby food in the beginning, eventually baby will be introduced to regular foods, and without any previous experience, they could still gag and choke. The difference is, that’s when the calories really start to matter! It’s important to allow time for learning and experimentation when baby is still somewhat relying on nutrients from breastmilk or formula.

“The more variety in flavor, texture, size, and shape you offer baby, the more skilled and open-minded he will be with different foods!” – Feeding Littles.

BLW is heavy on the finger foods but can involve some self-serve purees (or “baby-led purees”) as well. However, you may choose to skip purees all together! As far as the solids go, make sure to start with spears, strips or fry shapes. Once they start mastering their pincer grasp and chewing, you can add in smaller soft chunks. This method lets them eat at their own pace, develop their fine motor skills, and learn to chew and swallow their food before it really counts!

I HIGHLY recommend purchasing Oh Baby Nutrition’s Baby Knows Best Guide. She includes videos, recipes, and great information on all things feeding baby! I love her guide because she dives deep into both baby-led weaning and baby-led purees. We are mainly doing baby-led weaning but we do experiment some with purees, so I found her guide incredibly helpful. In fact, I printed all her recipes so I can review them every Sunday when I meal plan for our little family!

Use code TEMPLE15 for 15% off this guide.

I also recommend looking into Feeding Little’s Online Course. They are the OGs of BLW, so they really know their stuff! I purchased this guide too, mainly so I could feel extra informed before sharing tips with you guys! IMO, the best part of their online guide is the videos of babies eating and gagging (safely). Sounds weird, but this really puts my mind at ease and let me know what I should expect. I learned so, SO much from both guides – you can’t go wrong with either (or both)!

BENEFITS OF BLW:

  • Better table manners. They sit and eat with the family, instead of you having to feed them. Eating with baby is encouraged; they learn from watching you eat!

  • Research shows BLW eaters are less picky. This makes sense when you think about it! Temple has had roasted broccoli, spinach muffins, and lentils, all by 7-months.

  • Helps develop motor skills earlier on. They are using their hand-eye coordination daily when picking up food to eat. Great sensory play and fine motor skill development.

  • Introduced to more textures more quickly.

  • Easier on the whole family/less time-consuming! You don’t have to prepare special food for baby (like purees every day). They can have what you have (for the most part, especially after the first month or so), but in slices instead! You just have to watch salt/seasoning for them.

  • Restaurant friendly! Offer them what you’re eating. They can eat with you instead of you feeding them and then scarfing down your own meal while trying to entertain them.

  • They practice intuitive eating. They stop eating when full instead of you feeling like they need to finish a full serving of puree. No airplane spoon to the mouth to trick them into eating more!!

  • BLW gives your LO a healthy relationship with food. They choose how much and what they eat. You just continue to offer them things but you don’t stress about how much they eat or force them to finish the food. I know it can be frustrating when they don’t even touch a food you made, but just keep trying and they will decide when they’re ready for it! Example: Temple does not like greek yogurt. The second time I gave it to her, I added a swirl of almond butter and she ate 3-4 bites! That’s a win in my book!

  • It’s fun!!

TIPS FOR STARTING BLW:

  • Start with strips of food that they can grasp on the table. Small, bite-sized foods will frustrate them and could potentially be a choking hazard at first.

  • Start with only 2-3 pieces of food at a time.

  • Until their pincer grasps get better, you can pick up pieces of food and hand them to baby, but you should not put the food directly in his/her mouth. The goal is for Baby to eat with the family on their own, so try foods that can be enjoyed by everyone to make your life a little easier (and cheaper)!

  • Foods should be soft, but not so overcooked that they slip out of Baby’s hands. I steam or bake my veggies and hard fruits. This is recommended until baby is comfortable biting and chewing safely. Softer fruits and veggies can be offered raw (like the inside of a cucumber).

  • Foods should be soft enough to squish between your fingers.

  • Think about adding grass-fed, unsalted butter when baking fruits and olive oil with roasted veggies. Those extra fats are so good for Baby!

  • Small, round foods should be cut in half, lengthwise (like grapes and cherry tomatoes) to avoid dangerous choking.

  • As Baby gets older, you can give him/her smaller pieces. This means a transition from strips to clumps to small pieces.

  • At first, unseasoned foods are best. Once familiar with different foods, you can begin adding seasoning and spices (like curry powder or cinnamon) to broaden their palates.

FEAR OF GAGGING OR CHOKING?

  • The hardest part of BLW is the inevitable gagging in the beginning. This is totally normal at first and I highly recommend getting CPR certified- you can never be too prepared when it comes to your baby! For me, this made me much less nervous knowing I could act if Temple were to start choking.

  • I mentioned this before, Feeding Littles’ course features videos of babies eating and gaging. It helps to actually see what you should expect and what is extremely normal! Gagging is a good thing! It’s Baby learning how to chew and swallow foods.

  • Choking in very different than gagging. Choking is when their airway passage is blocked. They will make no noise if they are choking. Gagging is normal and safe, choking is not. 

  • They WILL gag in the beginning, but Temple honestly only did it a handful of times and hasn’t since those first 2 weeks of BLW. They learn quickly that they have to gnaw on foods longer so that they won’t gag.

  • Baby’s gag reflex is in the middle of their tongue (instead of way back), so yes they are gagging, but the food isn’t really near the back of their throat! Knowing that helped put me at ease a bit. That’s why they gag a lot- the reflex in right there in the middle.

  • DO NOT buckle baby into a highchair EVER when doing BLWIf choking occurred, you want to easily get them out.

  • The key is to let them gag and not to grab them or try to pull the food out of their mouth. You could actually lodge the food further down their throat and cause them to choke if you do this. They have a gag reflex for a reason.

  • Research shows that the risk of choking is the same when comparing baby led weaning and purees as long as you aren’t giving Baby foods that could be choking hazards!

IMG_7172.jpg

OTHER NORMAL THINGS THAT OCCUR DURING BLW?

  • Chewing followed by spit up. This is totally normal – they’re just figuring out this whole eating thing.

  • Weird faces from Baby.

  • Lots of play! I know it can be frustrating to see food go uneaten (or on the floor!) but this is part of the fun for babies! Don’t think of it as wasted food – look at it as an opportunity for Baby to explore textures and learn sensory aka make a little mess! Yes, it’s freaking adorable, but bath time has become so necessary now that Temple is eating. I usually let her eat in a diaper only to avoid a bigger mess.

  • Baby doesn’t like something. No worries – keep on trying! Wait a few days and try serving it again. If you don’t, Baby will end up only eating what he/she wants and they will train YOU! Those little boogers are smart!

  • Spills. My dogs have definitely put on a few pounds since we started BLW, but that just means less clean up for me!!


IMG_7174.jpg

BABY-LED PUREES?

This is when you cook the food (usually by steaming), puree it, and then let Baby take the lead with the actual feeding. Your baby is essentially “spoon feeding” his/herself. I am personally combining the BLW and BLP methods (aka, the BLISS Method).

Tips & Tricks for Temple’s purees:

  • I don’t scrape food off the top of mouth or off her face.

  • Use the loaded spoon- I put the food on her spoon then set the spoon on her high chair or hand it to her. This way, she brings the food to her mouth by herself. This method still allows her to develop fine motor skills, without expecting her to do too much of the heavy lifting in the beginning. I love NumNum GOOtensils for this!

  • Dump purees directly on her high chair and let her enjoy! It’s a fun mess and great for sensory development.

  • Three spoon circus– I learned this from Feeding Littles. It’s when you load two spoons with food and hand them to your LO (or place them on her tray). Once one spoon is empty, you load the third spoon and offer it to them. They will learn to drop the empty spoon in their hand to grab this third loaded spoon. Again, great for development!

  • Follow Baby’s hunger cues– do not bribe or force-feed baby. They will not overeat on their own.

WHY I CHOSE THE  “BLISS METHOD”:

The BLISS method is a combo of Baby-Led Weaning and Baby-Led Purees. I was a little too anxious to commit only to BLW and knew I wouldn’t want anyone else feeding Temple solid food without me there to supervise (at least for the first few months). My reason? Choking! I want to be honest with y’all and I know there are other mamas who worry about choking with BLW. I get more and more comfortable every time Temple eats and don’t worry anymore when I’m there to monitor the serving sizes we give her. However, I like knowing that some days I can just puree something and have it ready for whoever is watching her. TBH, I won’t even let Caleb feed her the BLW way when I am not there. Call me crazy, but I know my baby, and I feel more comfortable when I am there to make sure it’s done correctly. I’m sure that by the time she is 8-9 months I’ll feel more comfortable with others feeding her, but for now, this is what works for me and makes me feel most comfortable!

MY BABY ISN’T INTERESTED IN SOLIDS?

  • Keep insisting

  • Give them confidence- encourage them and praise them by telling them good job!

  • NO distractions- no TV or music playing in the background, or older siblings playing around them. They need to focus on their food.

  • Set an example by eating when they eat.

  • Patience- let them lead. There is a reason it’s called Baby-LED weaning  there is no rush!

  • Remember every baby is different! Your baby leads the way. Be patient and enjoy the journey!

WHAT TIME OF DAY SHOULD I FEED BABY (AT 6-MONTHS OLD), AND HOW MUCH FOOD SHOULD I OFFER?

Food should be served 45 minutes to an hour after milk feeding, and not too close to nap/bedtime. You don’t want baby to be too full, too tired, or sick. That might set you up for a bad feeding.

At 6-months, I only fed Temple her solids once a day around 4:30-5:00 pm. She wakes up from her last nap of the day around 3:30 pm and I nurse her immediately. Then, I wait about 45 minutes before feeding her dinner (the real foods). After dinner, we bathe and get ready for bed. She goes to bed between 6:30-7:00 pm.

Temple is about 7 months now, and I’ve started feeding her twice a day. Usually lunch (11:00 am) and dinner ( around 5:00 pm). At 9 months, I will start serving breakfast, lunch, and dinner. I try to always serve two veggies and one protein. And be sure there is a fat included in every meal at this point!

IS MY BABY GETTING ENOUGH CALORIES?

Baby’s main source of calories, fats, and nutrients are still coming from breast milk or formula for the first year.

I offer Temple 1 or 2 pieces of each food to start. I often try to eat with her to show her how it’s done. That’s the best way to get baby interested! Baby probably won’t eat a lot to start. It’s totally fine for your LO to be uninterested or just play with the food.

Follow your LO’s cues. If they seem to be interested in what you’re feeding them, then offer more! Trust me, you will know when they are over it! Don’t stress about how much food is actually going into their belly. They will do a lot of playing and dropping food on the ground until their pincer grasp gets better. Let baby lead the way and have fun with it!!

BABY’S POSITION WHILE FEEDING:

  • Baby needs to be in the high chair, upright and no leaning backward. If you follow me on Instagram,  I have a whole BLW section saved to my highlights. Check it out to see exactly how I position Temple in her high chair. When she was really small at the start of BLW, I would roll up a towel to place behind her so that she was upright to prevent choking.

  • Don’t EVER buckle Baby into the high chair when eating the baby-led weaning way. If they were to choke, you must be able to pull them out of the high chair super easily.

  • Elbows should be over the table, this ensures they are not leaned too far back.

ALLERGENIC FOOD AND MY APPROACH:

After researching, I decided to introduce allergenic food soon after Temple started her food journey! Waiting to introduce allergenic foods may actually increase the risk of an allergy to that food. But, check with your pediatrician before tackling this, especially if your baby is especially at risk when it comes to allergies (runs in family, eczema, reacted to breast milk when mama ate certain foods, etc).

Only introduce allergenic foods when Baby will be up for a few hours so you can keep an eye out for reactions. Offer each food 2-3 times without mixing with any other allergic foods. If baby reacts with hives, rash, difficulty breathing or anything that doesn’t seem normal- call your doctor!

Introducing allergic foods while still breastfeeding is great! Breast milk is known to lessen reactions to allergies, so I highly recommend introducing all the foods below if you are still breastfeeding and your LO isn’t considered high-risk. But again, talk to your pediatrician first and do what feels right for your family.

  • Peanuts

  • Tree Nuts

  • Soy

  • Dairy – Always give them full-fat. We love full-fat Greek yogurt, cottage cheese, or strips of cheese

  • Wheat- We like strips of whole wheat toast (love Whole Foods bread from their bakery), and spiral whole wheat noodles and gluten-free brown rice spiral noodles.

  • Shellfish

  • Finned fish (like salmon or cod)

  • Citrus Fruits and Strawberries- known to cause a rash on face/butt. If reaction, then delay for a few weeks, reintroduce and watch for a reaction.

  • Egg Whites- I introduced when Temple was almost 7 months. Some say to wait till 9m, but Temple wasn’t showing signs of any other allergies, so I felt she was ready. The yolk is more nutrient-dense, so you could offer this as an omelet cut into strips before the egg white if you want!

Foods I will delay:

  • Honey- can cause infant botulism. Do NOT introduce till at least 12 months.

  • Stringy foods (like green beans or parsnips) and foods with tough skin – I will delay these until I feel Temple is comfortable and not gagging too much anymore.

  • Milk- breast milk and formula should be the main milk until 12 months.

WHY DON’T I LIKE TO USE PACKAGED AND JARRED BABY FOODS?

Pouches do NOT teach chewing skills. There’s no sensory input and they are usually too sweet. Even the ones with vegetables tend to be much sweeter than when you cook from home. When eating out of a pouch, baby is going to be sucking it down very quickly and not realizing that they might actually be full. Most of these packaged purees have the same textures, and a variety of textures is so important for development. When you go from same textured purees to real food at age of one, it can be tough for your LO and cause picky eating.

If you are on-the-go and a pouch is your only option, I’ve read that using a straw with your own purees is best. Or, try bringing a bowl and spoon with you and pour the pouch in. That way, your LO can feed themselves the baby-led puree way!

I try to cook all her foods and choose organic as much as possible to ensure the max amount of nutrients and higher enzyme activity than packaged or jarred food.

Read this article for more on why you should rethink baby food pouches!

BLW RECIPE IDEAS:

Food high in iron is best in the beginning. Baby’s iron stored from birth starts to deplete after around 6 months.  I would hold off on meat until you see that baby can safely chew and swallow. Then, offer it in strips that can be held easily and sucked or chewed.

  • Avocado strip (you could lightly roll it in breadcrumbs to help them grasp)

  • Softly cooked broccolini (longer stem for them to grasp)

  • Cottage cheese


  • Instant pot sweet potatoes

    • add 1 cup water to bottom and cook on high for 15 minutes. SO EASY!


  • Cooked sweet potato “fries”

  • Carrot fries

    • toss carrot sticks in olive oil and 1 clove minced garlic. Bake at 350 for 15 minutes, flip, and bake another 15 minutes on the other side.

    • reminder- they should be able to squeeze between fingers.

  • Banana with peel handle

  • Full-fat Greek yogurt (I like Stonyfield Greek or regular yogurt, and Forage Cashewgurt) with add-ins like:

    • Chia seeds

    • Mashed or pureed berries

    • Drizzle of nut butter (peanut, almond, cashew)

  • Egg cooked into an omelet and cut into strips

  • Kiwi strips

  • Bone broth to sip on- use this as a guide for making bone broth but keep seasonings to a minimum for baby.

  • Toast strips with a thin layer of hummus on top. I love Ezekiel 4:9 bread and Whole Foods whole wheat bread from the bakery. Whole wheat bread is best. Make sure there aren’t too many large seeds in the bread you choose.

  • Peanut butter and smashed blueberry toast strips

  • Baked pears in coconut oil (remove peel for younger babies)- love this recipe in OhBabyNutritions guide.

  • Mango strips- helps loosen up baby’s stool. So if you are including foods that constipate in the meal (such as rice or carrots) add mango as a fruit to balance and help!

  • Pinto/Black Beans:

    • Boiled till soft and smush them with a fork. I don’t puree these.

  • Eggy Spinach Bread

  • Tuna Zucchini Pancakes 

  • Rice or quinoa mixed with hummus or avocado- helps stick together for easier grabbing off the table or to load on a spoon.

  • Homemade applesauce

    • 1 organic peeled and cored apple and dash cinnamon. Add to blender and done!

  • Banana Pancakes: whisk eggs, mash banana and combine all ingredients. Heat skillet over medium heat in a little grass-fed unsalted butter. When hot, cook blend into pancake shapes. Cook, let cool, and cut into small stripes. (image below) This is a great make-ahead dish for easy meal during week.

    • 2 eggs

    • 1 banana

    • Chopped spinach

    • Mashed berries (optional)


IMPORTANCE OF WATER AND BONE BROTH:

Breast milk or formula is the main hydration for the first year, but small amounts of water can help with digestion and constipation. Temple LOVES her sips of water. We started offering sips of water from the start (6 months). When she drinks water, I offer her water in this cup but I actually take the lid off and do open cup drinking. Sippy cups aren’t the best for feeding development. I always bring the water glass up and let her come to the cup. Then, I count 1, 2 and take the water away. If she reaches or leans for more, then I will do this again.

At 9-10 months, we will start offering her 4-5 ounces at each meal.

Bone broth is another great liquid to include in Baby’s diet. I add bone broth when pureeing food and small sips at the end of her meal. Temple loves it! I learned all about it through OhBabyNutritions Ebook (use code TEMPLE15for 15% discount).

There are also other liquids you could offer every so often, like coconut water. However, regular water is obviously #1! Remember, water does not replace breast milk or formula for the first year.

PRODUCTS WE LOVE:

INSPIRING BLW ACCOUNTS/WEBSITES TO FOLLOW:

  • Instagram: @OhBabyNutrition and ebook: Baby Knows Best (Use discount code: Temple15 for 15%)

  • Instagram: @FeedingLittles and online course

  • Instagram: @BLWideas

  • Instagram: @Babyledweaningideas and website for recipes

  • Instagram: @Inspiralizedkids and website for recipes

BABY SIGN LANGUAGE:

I bought this super simple book to learn a few signs to communicate with Temple. She doesn’t know any of the signs yet, but I make sure to practice with her every day. For instance, after each meal, diaper change, and bath I sign “All Done.” When I offer her water, I do the sign for “water.” And when I load more food on her high chair I do the sign for “more.”


Your baby is ready to eat!!


Your baby is ready to eat! Now what?


DISCLAIMER: ALWAYS CHECK WITH YOUR DOCTOR BEFORE MAKING ANY CHANGES TO YOUR BABIES DIET OR LIFESTYLE

FEEDING BABIES SOLIDS

We wait until around six months to introduce solids but most doctors say you can start anywhere from 4-6 months. It depends on neck strength to hold up the head, loss of the tongue thrust reflex that results in baby pushing out food, if your baby seems hungry even after breastmilk/formula, being able to sit up, and if your baby seems interested when you eat. Even when Charlie was doing many of these things I still waited until he was around six months.

Always remember that in the beginning, feeding your baby is all for fun and it should be just that! You won’t decrease breastmilk or formula at first because you are feeding your baby small amounts just to get used to eating and to the many different tastes and textures.

Make sure not to overfeed your baby in the beginning. Start out with two meals per day, feeding your baby 2-4 tablespoons. (4-6 months old). At 7-12 months, feed him/her three meals, each the size of a baby’s fist.

What should babies eat?

You can pretty much start with anything, either fruits, veggies, or meat. As long as it’s pureed it doesn’t really matter what you choose. Baby led weaning is another option that I do not have experience with when it comes to first foods. Just a reminder that honey and corn syrup should not be introduced until after age 1.

One thing I feel passionately about it giving your baby the highest quality of foods you can afford. Even if you don’t eat organic produce, grass-fed beef or free range eggs I personally feel the splurge is worth it for your baby.

I skip right over rice cereal. There are so many reasons why but the main and most important one is that rice cereal contains arsenic. Yup, arsenic.

I personally chose meat over rice cereal and grains which have the same level of fortification of iron and zinc as fortified cereals. To make up for that iron needed for breastfed babies only (there is usually enough iron in formula) I incorporate grass fed lamb and grass fed beef.

Breastfed babies iron levels drop at around 6 months so they do need iron packed foods because their iron stores are depleted, your 6- to 12-month old baby needs to be consuming about 11 mg of iron per day.

“Although babies do not need grains, they do need to eat complex carbohydrates, Peternell said, adding that butternut squash, zucchini and sweet potatoes are all excellent choices. If you choose to feed your baby grains, choose a variety such as oats, multigrain cereal, barley, quinoa and millet. In fact, breastfed infants who were fed pureed meat had higher levels of iron and zinc than those who were fed an iron-fortified infant cereal, according to a study in the Journal of Pediatric Gastroenterology and Nutrition.

If you’re raising your baby as a vegetarian, egg yolks are also a good option. Although legumes are iron-rich, they’re not a complete protein unless they’re combined with grains and they should be offered occasionally and when your baby is older, Peternell said.

If you decide to offer grains and you find it makes your baby constipated, foods such as prunes, plums, pears, peaches and apricots can help combat it.

Also, keep in mind that no matter what types of foods you introduce, you should start to offer a new first food every three to five days.

The most important thing is you want to give your baby a wide variety of solids,” Ansel said." Source: FOX

FIRST FOODS

I like introducing foods that are nutrient dense. These include: blended red meat, egg yolk, liver, avocado, banana, squash, meat stock or bone broth.

“1. BLENDED RED MEAT

2016 study found that babies who eat along the lines of baby-led weaning are more likely to be deficient in iron, zinc, and vitamin B12, which are super critical nutrients for your growing baby.

Vitamin B12 can only be found in animal foods, and the best sources of iron and zinc are found in red meat like grass-fed lamb or beef.

Keep in mind that breastmilk is low in iron (whereas formula is iron-fortified), so we must get it through diet. Plant sources of iron are poorly absorbed—especially for an immature digestive system that has a harder time converting plant-based iron to the kind we can use—so heme (red meat) iron is best.

To prepare: Once you cook the meat, be it ground meat, or a lamb chop or tender roast, put it into a blender with some filtered water or broth and blend it into a creamy puree to spoon feed to baby.

2. Egg yolk

Loaded with healthy fat, choline (great for baby’s brain and eyes!), and necessary cholesterol—it’s the building block for ALL of our hormones—pastured egg yolks are an easy first food for your baby. Sensing how nutrient-dense egg yolks are, babies often gobble them right up (once they get used to the texture and taste, that is!).

Egg yolks also contain important minerals that baby needs right now like calcium, zinc, selenium, phosphorus as well as vitamin E and vitamin B6.

To prepare: Be sure to soft cook the yolks as not to damage the nutritional profile. Either soft boil the egg and take out the undercooked yolk, lightly poach the egg or cook it over easy. It’s best to serve egg yolks with a bit of fat for optimal absorption of the nutrients, as well as for better digestion (and taste!). Coconut oil may be easiest if it’s in liquid form. You can then sprinkle some shredded liver into it for an extra boost of nutrition.

3. Liver

Offal, or organ meats, are not really part of our culture anymore—but they should be! Organ meats are still an amazing food choice due to their high concentration of nutrients. Liver is also high in true vitamin A, which is extremely important to baby’s development. (Yes, carrots and other orange foods contain beta-carotene, but it doesn’t easily convert to true vitamin A, which is why many babies turn slightly orange when they eat beta-carotene rich foods!) The best source of true vitamin A is animal products, particularly liver.

Liver also contains vitamin D, all B vitamins, folate, zinc, and CoQ10. If you choose chicken liver, you get a good amount of iron as well, which is vital.

To prepare: Purchase high-quality, grass-fed beef, bison or lamb liver. Cook over medium heat in a frying pan in a little ghee or coconut oil. Once one side is brown (not browned or burnt), flip liver and brown the other side. (It cooks fast so keep your eye on it!) You can then add to blender with a little water or broth and serve as a puree. Or, you can let the liver cool and then grate over baby’s egg yolk or banana mash. Do not over feed your baby liver, small amounts are the perfect size.

4. Avocado

Avocado is a great first food. It contains lots of healthy fats, as well as the almighty mineral magnesium, which is so crucial to our health yet is harder and harder to get enough of through our food these days.

Avocado also contains B vitamins including niacin, vitamin E, vitamin K, potassium, folate, and fiber.

To prepare: Cut a whole avocado in half lengthwise, and twist to open. Run a butter knife from top to bottom to make slices, and scoop out with a spoon. Likewise, you can mash or puree the avocado and spoon-feed it to your infant. It’s delicious mashed with ripe banana for a 1:1 ratio.

5. Banana

Some people believe that baby’s first foods shouldn’t include any fruit because baby will get a preference for the sweetness. Truth is, baby already has a preference for sweetness thanks to breastmilk! So don’t worry about baby becoming a sugar bug because of fruit. Bananas are a great first carbohydrate source for babies because they contain amylase, an enzyme necessary for the digestion of carbohydrates (like, bananas!).

Bananas are also a great source of important nutrients like vitamin B6, vitamin C, manganese, magnesium, and potassium.

To prepare: Be sure to select bananas that are very ripe with brown spots as this is a sign that some of the banana’s starch has been converted to a simple sugar, making it easier for baby to digest. It will also be softer and easier to mash. Use a fork and mash by itself or with a little avocado, liver or egg yolk.

6. Butternut/acorn squash with butter

Another easy to digest carbohydrate source is well cooked winter squash. It’s not as starchy as yams and isn’t high in nitrates (more on that below).

Squash is also high in vitamin A, vitamin C, magnesium, potassium and manganese.

To prepare: Cut open your acorn or butternut squash and remove seeds with a spoon. Put on a roasting pan with a little water and bake for 1 hour at 350 degrees, or until the squash is soft and the skin easily separates from the fleshy part of vegetable. Alternatively, you can put in your Instant Pot with 1 cup of broth or water and cook for 7 minutes. Let cool and scoop out flesh. Add in some butter or ghee, which will help convert the beta-carotene into usable vitamin A. Mash well with fork or immersion blender. Serve room temperature.

7. Meat stock or bone broth

Homemade broth or stock contains gelatin, an easy to digest protein, as well as minerals like calcium, magnesium, phosphorus, and sulphur.Broth or stock is particularly excellent at coating and soothing the digestive tract too, which can help strengthen it in preparation for eating harder-to-digest foods (like the difficult-to-digest proteins gluten and casein) later in life.

To prepare: you can find a recipe (with a “how to” video) for chicken stock here.

8. Fermented foods like traditional sauerkraut and whole yogurt

Once baby is a little older, you can add in some sour tasting foods like traditional sauerkraut. Cabbage is an excellent source of vitamin K, but in its raw or cooked state, it’s hard to digest. Fermented cabbage, i.e., sauerkraut, on the other hand, is amazing for digestion. The sour taste stimulates our digestive organs such as the gallbladder and liver. It’s naturally rich in health-promoting probiotics to help colonize baby’s gut with beneficial bacteria—crowding out the bad, and building up the good.

Organic whole yogurt is another excellent food rich in easy to digest protein and fat and rich in calcium, vitamin D and phosphorus. It’s best to wait till 12 months before introducing dairy products (with the exception of eggs, butter or ghee). You can find great grass-fed yogurts at Whole Foods or prepare yourself at home.

To prepare: Make your own sauerkraut, follow this recipe. If DIY isn’t your thing, you can also buy traditionally fermented sauerkraut in health food stores like Whole Foods. Make sure you find it in the refrigerated section and that there is no vinegar on the ingredient list. Vinegar is often added to mimic the taste of natural fermentation—even if the product is not actually fermented (thus not containing any beneficial bacteria). Offer baby a small amount of the sauerkraut juice to get him used to the sour taste. Soon, he’ll love it! “ Source: Mama natural.


food allergies

New research shows introducing common allergy causing foods by 12 months of age and as early as 4-6 months can be a good thing. Eggs, peanuts, and fish are some of these foods. Exposure may reduce the the chance of developing an allergy. You should give these foods regularly (2X per week to maintain tolerance. Start by rubbing a small amount on your babies inner lip and if tolerated after a few hours you can slowly introduce as part of their diet. ALWAYS have Benadryl on hand.


What baby feeding products we love at the Nipple Household

Baby products we love that have to do with feeding!

BabyBrezza Glass One Step Baby Food Maker

As you knowI’m a huge fan of the BabyBrezza products, so their food maker comes highly recommended.  We introduced solids at 6 months and I used the BabyBrezza from day one.  It is so incredibly easy. You simply put the raw food in the glass bowl, steam, and blend. Whether it’s vegetables, fruit or meat, the BabyBrezza steams and blends the food in one application. The BabyBrezza also comes with recipes organized by age, so you know what foods are age appropriate for your little one. Clean up is also very simple just throw almost every piece in the dishwasher and that’s it! This is one of those products I still use every single day. Now that my son is one, I do not need to blend the foods, but I still use the steamer. 

Fresh Squeezed Squeeze Station

This product is a perfect pair with the Baby Brezza.  Making all your own baby food has many benefits, but you need a way for your baby to enjoy it on the go, right?! This unit presses your homemade baby food into individual pouches for convenient storage and feeding. Just pour in the puree, press down to fill, squeeze and enjoy. I used this primarily for preparing food when we were traveling or on the go! You can also freeze the packets for your little one to enjoy at a later date. 

High Chair:  I recommend the 4 moms highchair. The tray is magnetic for easy on and off one handed use. There is also a tray liner you can throw right in the dishwasher or clean in the sink without having to clean the entire tray. The high chair also has bowls that are magnetic that stay secured right on the high chair tray preventing you baby throwing the bowl over the edge.  Because the tray liner is so easy to clean, our son’s food goes right on the tray liner. The foam seat is removable and very easy to wash. Overall, I love this highchair for both functionality and its contemporary look. 

Inglesina Fast Table Highchair:  This is such a great chair to have for both on the go and at home use. We use it at home when we want to have our baby pulled right up to the table. It’s been such a great product for on the go use. Whether it’s a long weekend at my parent’s home or a nice lunch out, this highchair makes eating on the go easier.

Boon Pulp: This is a really fun way for your baby to explore foods and it’s also great for teething! These durable silicone feeders make it easy for your little one to test out fruits and vegetables with its ingenious design and baby-friendly handle, while the easy-clean, dishwasher-safe design makes it parent-friendly, too.

Comotomo Baby Bottles:  These bottles have worked really great for us. I love how soft and squishy they are. The bottle features a silicone nipple that mimics feeding at the breast and eases breast-to-bottle transitioning. The wide-neck design makes for easy dishwasher cleaning, while strategic, leak-free vents are designed to help prevent colic.  They’ve been dishwasher cleaned too many times to count and they still look brand new.

Recipes

Babybrezza has some great recipes, you can find them HERE. Scroll to the bottom of the link to find them.

You can find a steam guide for steaming foods, HERE.

You can find an ingredient guide, HERE.


Embed Block
Add an embed URL or code. Learn more